How to install Icinga 2 on Opensuse/SLES 15
Welcome to our step-by-step guide on installing Icinga 2, an open-source monitoring solution, on SUSE Linux Enterprise Server (SLES) or openSUSE 15. Icinga 2 is a powerful and versatile monitoring tool designed to oversee the health of your network, servers, and services. With its robust features and flexibility, Icinga 2 offers real-time insights into system performance, aiding in proactive issue resolution and ensuring the reliability of your infrastructure. In this guide, we’ll walk you through the installation process of Icinga 2 on SLES or openSUSE 15, providing detailed instructions, configuration steps, and tips to set up a robust monitoring environment tailored to your specific needs. Let’s embark on the journey of implementing a comprehensive monitoring solution using Icinga 2 on your SUSE-based system.
Update OS
as root
zypper refresh
zypper update
zypper is a package manager used in some Linux distributions, like openSUSE, to manage software packages, repositories, and updates.
zypper refresh: This command updates the local package repository database. It checks for any new or updated packages in the repositories you have configured on your system but doesn’t actually install or update any packages. It just syncs the local package database with the remote repositories, ensuring that when you perform an update, you have the most current information about available packages.zypper update: This command is used to update the installed packages on your system. When you runzypper update, it compares the versions of installed packages with the versions available in the repositories. It then installs newer versions of the packages, if available, bringing your system up to date.
So, the typical sequence would be to first refresh (zypper refresh) to ensure you have the latest package information from the repositories, and then perform the actual updates (zypper update) to install any available newer versions of the installed software packages.
Add Icinga Repositories and Import Keys
rpm --import https://packages.icinga.com/icinga.key
This command is used to import the GPG key for the Icinga repository. Let’s break it down:
rpm --import: This is a command to add or import a key into RPM, the package manager used in many Linux distributions. The-importflag specifies that you’re importing a key.https://packages.icinga.com/icinga.key: This is the URL from which the GPG key is being fetched. GPG (GNU Privacy Guard) keys are used to verify the integrity of packages downloaded from repositories. By importing this key, you’re telling your system to trust packages signed by this key, ensuring they come from a trusted source.
In this specific case, the command is fetching the GPG key from https://packages.icinga.com/icinga.key and importing it into the system’s keyring. This allows the system to verify the authenticity and integrity of packages obtained from the Icinga repository.
zypper ar https://packages.icinga.com/openSUSE/ICINGA-release.repo
The command zypper ar is used in openSUSE (or SUSE Linux) to add a new repository to the system. Let’s break down the command you provided:
zypper ar: This is the command used withzypper, the package manager in openSUSE, to add a new repository.https://packages.icinga.com/openSUSE/ICINGA-release.repo: This URL points to a repository configuration file for Icinga. This command is instructingzypperto add this repository to the system. Repository configuration files contain information about where to find packages, their versions, and other details necessary for package management.
So, the zypper ar command you’ve provided is adding the Icinga repository to your system, allowing you to install packages from Icinga using zypper. This repository can now be used to access Icinga software and updates via the package manager.
zypper ar https://download.opensuse.org/repositories/server:/monitoring/15.5/server:monitoring.repozypper refThe zypper ref command in openSUSE is a shorthand for zypper refresh. It updates the local package repository metadata, essentially syncing the local package database with the remote repositories.
By executing zypper ref, you ensure that your system has the most up-to-date information about available packages from the repositories configured on your system. This command doesn’t install or update any packages; it just refreshes the repository metadata, allowing you to see the latest available packages when you perform package management tasks like installation or updates.
Install Icinga Core Components and Plugins
zypper install icinga2 icingadb-redisThe command zypper install icinga2 icingadb-redis in openSUSE’s zypper package manager is used to install the Icinga 2 monitoring software and the IcingaDB Redis module.
zypper install --recommends monitoring-plugins-allThe command zypper install --recommends monitoring-plugins-all in openSUSE’s zypper package manager is used to install a package called monitoring-plugins-all along with its recommended dependencies.
monitoring-plugins-all: This is a meta-package or a package that doesn’t contain any files itself but depends on a set of other packages. In this case, it’s likely a package that pulls in a comprehensive set of monitoring plugins.
The --recommends flag tells zypper to also install the recommended dependencies for the specified package. These dependencies are additional packages that are suggested to complement or enhance the functionality of the main package being installed (monitoring-plugins-all in this case).
Executing this command will prompt zypper to download and install the monitoring-plugins-all package along with any additional packages recommended for comprehensive monitoring functionalities. This could include various plugins used for monitoring different aspects of systems, networks, or services.
Set Up Icinga API and Restart Services
icinga2 daemon -CThe command icinga2 daemon -C is used in Icinga 2 to check the configuration syntax without actually starting the Icinga 2 daemon.
Breaking it down:
icinga2: This is the command-line utility for managing and interacting with Icinga 2.daemon: It refers to the daemon-related actions, which involve starting, stopping, or checking the status of the Icinga 2 daemon (the service that runs Icinga 2).C: This flag is used to perform a configuration check without starting the daemon. It reads the configuration files and performs a syntax check to ensure that the configuration is valid and doesn’t contain any errors.
Executing icinga2 daemon -C will analyze the configuration files for Icinga 2 without actually launching the Icinga 2 daemon. It’s a good practice to use this command before restarting or reloading the Icinga 2 service to avoid potential issues with misconfigured settings.
icinga2 api setup
The icinga2 api setup command is used in Icinga 2 to configure the API (Application Programming Interface) settings.
When you run icinga2 api setup, it initiates a setup wizard that helps you configure the API features of Icinga 2. This setup process involves defining authentication credentials, specifying access permissions, and configuring encryption settings for the API.
The API in Icinga 2 allows external applications or tools to interact programmatically with the Icinga 2 monitoring system. This interaction can involve querying for status information, sending commands, or retrieving monitoring data.
During the setup process, you’ll typically be prompted to set up an API user, define its permissions, and configure how the API will be accessed securely.
This command is crucial for establishing a secure and functional API setup within Icinga 2, enabling external systems or applications to interact with Icinga for monitoring or management purposes through the defined API endpoints.
systemctl restart icinga2
Install PHP and Required Extensions for Icinga
zypper install php-gd php-pgsql php-ldap php-mbstring php-mysql php-curl php-xml php-cli php-soap php-intl php-zip php-xmlrpc php-opcache php-gmp php-imagick php7-pcntl php7-sockets
The command , zypper install, along with a list of PHP packages, is used in openSUSE’s zypper package manager to install various PHP extensions and modules.
Here’s a breakdown of each package mentioned:
php-gd: PHP extension for GD graphics library, used for image processing.php-pgsql: PHP extension for PostgreSQL database connectivity.php-ldap: PHP extension for LDAP support.php-mbstring: PHP extension for multibyte string handling.php-mysql: PHP extension for MySQL database connectivity.php-curl: PHP extension for handling CURL functions.php-xml: PHP extension for XML support.php-cli: Command-line interface for PHP.php-soap: PHP extension for SOAP (Simple Object Access Protocol) support.php-intl: PHP extension for internationalization support.php-zip: PHP extension for ZIP archive support.php-xmlrpc: PHP extension for XML-RPC support.php-opcache: PHP extension for opcode caching.php-gmp: PHP extension for GNU Multiple Precision extension.php-imagick: PHP extension for ImageMagick functionality.php7-pcntl: PHP 7 extension for process control.php7-sockets: PHP 7 extension for socket support.
Executing zypper install followed by these package names will prompt zypper to download and install the mentioned PHP extensions and modules on your openSUSE system, enabling additional functionalities and capabilities within PHP for various purposes, including database connectivity, image processing, network operations, XML handling, and more.
Install MariaDB
zypper install icingadb mariadb-server
The command zypper install icingadb mariadb-server in openSUSE’s zypper package manager is used to install the IcingaDB and MariaDB Server packages.
icingadb: This likely refers to the IcingaDB package, which provides a database backend for Icinga, allowing the storage and retrieval of monitoring data.mariadb-server: This package installs the MariaDB database server, which is a popular open-source relational database management system and a fork of MySQL.
Executing this command will prompt zypper to download and install both IcingaDB and MariaDB Server on your system. IcingaDB will provide the database backend for Icinga, enabling it to store monitoring data, while MariaDB Server will serve as the actual database server software handling the data storage and retrieval.
service mariadb start
systemctl enable mariadb
The command systemctl enable mariadb is used in Linux systems that utilize the systemd init system to enable the MariaDB service to start automatically at system boot.
When you execute systemctl enable mariadb, it creates a symbolic link from the service file of MariaDB in the /etc/systemd/system directory to the appropriate target (usually in the /etc/systemd/system/multi-user.target.wants/ directory). This linkage ensures that systemd starts the MariaDB service during system startup or when the relevant target is activated.
Enabling a service means that it will automatically start whenever the system boots up or whenever the target where it’s linked is triggered.
mysql_secure_installation
mysql_secure_installation is a command-line script available in MySQL and MariaDB that helps secure the database installation by performing several security-related tasks. These tasks typically include:
- Setting a Password for the Root Account: It prompts you to set a password for the MySQL or MariaDB root user account if there isn’t one already set.
- Remove Anonymous Users: It removes any anonymous user accounts that have no password, which could be a security risk.
- Disallow Remote Root Login: It restricts the root user from logging in remotely, enhancing security by ensuring the root user can only connect from the local machine.
- Remove Test Databases: It deletes the test databases that are created by default, which aren’t necessary for production and can pose a security risk.
- Reload Privilege Tables: It reloads the privilege tables to apply the changes made, ensuring that the changes take effect immediately.
This script is particularly useful after the installation of MySQL or MariaDB to immediately address common security vulnerabilities and strengthen the overall security of the database system. It’s recommended to run mysql_secure_installation after installing MySQL or MariaDB to secure the database environment.
Prepare Databases
mysql -e "CREATE DATABASE director CHARACTER SET 'utf8';
  CREATE USER director@localhost IDENTIFIED BY 'CHANGEME';
  GRANT ALL ON director.* TO director@localhost;"
Let’s break down the SQL commands:
CREATE DATABASE director CHARACTER SET 'utf8';: This creates a new database nameddirectorwith the character setutf8, which is commonly used to support various languages and characters.CREATE USER director@localhost IDENTIFIED BY 'CHANGEME';: This creates a new MySQL user nameddirectorwho can connect only from thelocalhost(the same machine) and is identified by the password'CHANGEME'.GRANT ALL ON director.* TO director@localhost;: This grants all privileges on thedirectordatabase to thedirectoruser when connecting fromlocalhost. This includes permissions for operations such as SELECT, INSERT, UPDATE, DELETE, etc.
When executed using the mysql command-line tool with the -e flag followed by the SQL commands within double quotes, these SQL statements will be executed in sequence against the MySQL or MariaDB server. It creates a database, a user, and grants that user full privileges on the specified database, all from the command line.
mysql -e "CREATE DATABASE icingadb;
  CREATE USER 'icingadb'@'localhost' IDENTIFIED BY 'CHANGEME';
  GRANT ALL ON icingadb.* TO 'icingadb'@'localhost';"
mysql -e "CREATE DATABASE icingaweb2;
  GRANT ALL ON icingaweb2.* TO 'icingaweb2'@'localhost' IDENTIFIED BY 'CHANGEME';"
Import DB schema
mysql -u root icingadb </usr/share/icingadb/schema/mysql/schema.sql
This command uses the mysql command-line tool to import a SQL file into a MySQL or MariaDB database named icingadb.
Breaking down the command:
u root: Specifies the userrootfor MySQL to log in as.p: Prompts for the password of therootuser.icingadb: Specifies the name of the database into which the SQL file will be imported.</usr/share/icingadb/schema/mysql/schema.sql: Redirects the contents of the specified SQL file (schema.sql) into themysqlcommand for execution.
This command is essentially importing the SQL schema file (schema.sql) located at /usr/share/icingadb/schema/mysql/ into the icingadb database, using the root user’s credentials. The SQL file likely contains instructions to create tables, define schemas, and set up the structure for the icingadb database.
Enable and Restart IcingaDB and Icinga2 Services
systemctl enable --now icingadb
systemctl enable --now icinga2
systemctl restart icingadb icinga2
systemctl enable --now icingadb-redis
Install Icinga Web Components, Set Permissions, and Restart Services
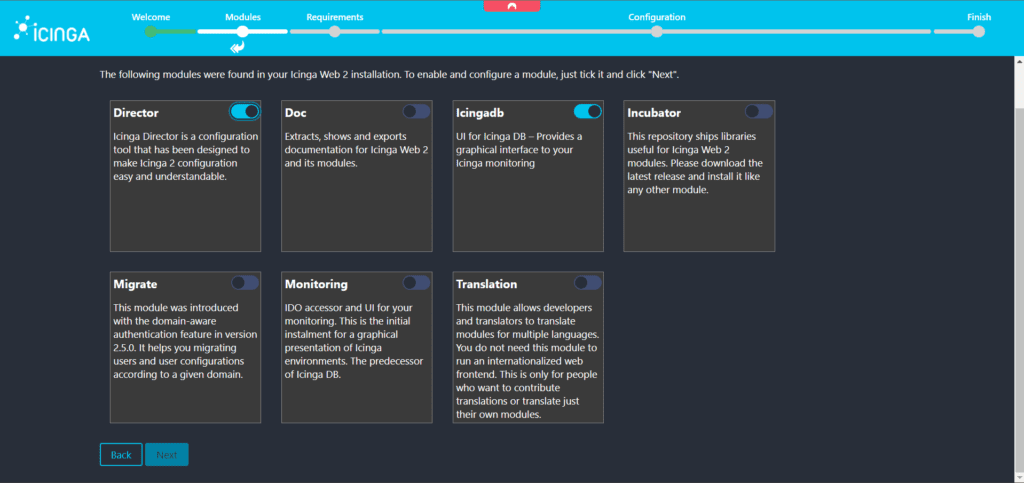
zypper install icingaweb2 libapache2-mod-php icingacli icingadb-web icinga-director
Let’s break down each package mentioned:
icingaweb2: This is the main package for Icinga Web 2, which is a modern web interface for Icinga monitoring.libapache2-mod-php: This package contains the Apache web server module for PHP, allowing Apache to process PHP files.icingacli: This package includes the Icinga command-line interface tool, used for various administrative tasks in Icinga.icingadb-web: This package likely includes the web interface components specific to IcingaDB, providing a web-based interface for managing IcingaDB.icinga-director: This is the Icinga Director package, which is an add-on for Icinga Web 2 that provides a graphical interface to manage Icinga configuration, making it easier to configure and maintain your monitoring setup.
Executing zypper install followed by these package names will prompt zypper to download and install these components, enabling you to set up and manage Icinga, its web interface, and related tools for monitoring and configuration management.
Update permissions
chmod -R 775 /var/lib/icingaweb2
chmod -R 775 /etc/icingaweb2
Restart services
systemctl restart icingadb icinga2 icingadb-redis
Enable Icinga Features and Configuration Setup
icinga2 feature enable icingadb
The command icinga2 feature enable icingadb is used to enable the IcingaDB feature within Icinga 2.
Breaking it down:
icinga2: This is the command-line utility for managing and interacting with Icinga 2.feature enable: This sub-command is used to enable specific features within Icinga 2.icingadb: Refers to the IcingaDB feature that you’re enabling.
Enabling the IcingaDB feature allows Icinga 2 to utilize and interact with IcingaDB, enabling the storage and retrieval of monitoring data in the IcingaDB backend. Once enabled, Icinga 2 will start utilizing IcingaDB for storing monitoring data, enhancing scalability and performance for large-scale monitoring environments.
icingacli setup config directory --group icingaweb2
The command icingacli setup config directory --group icingaweb2 is used with the Icinga Command Line Interface (CLI) to configure the directory for storing configuration files, specifically for the group icingaweb2.
Breaking it down:
icingacli: This is the Icinga Command Line Interface (CLI) utility used for various administrative tasks and configurations in Icinga.setup config directory: This sub-command is used to set up or configure the directory where configuration files will be stored.--group icingaweb2: Specifies the group (icingaweb2) for which the configuration directory is being set. This means the configuration files will be organized or related to theicingaweb2group.
Executing this command will configure the directory location where configuration files associated with the icingaweb2 group, likely related to Icinga Web 2, will be stored. This configuration helps in organizing and managing the settings and configurations specific to the icingaweb2 component within the Icinga setup.
icingacli setup token create
The command icingacli setup token create in Icinga’s Command Line Interface (CLI) is used to generate an authentication token. This token is typically used during the setup process for authentication and authorization purposes.
When you execute icingacli setup token create, Icinga CLI generates a token that can be used for various setup-related tasks or authentication procedures within the Icinga environment. This token might be used to authenticate access or perform specific actions during the initial setup or configuration of Icinga services or components.
This token is generally used in combination with other setup or configuration commands to verify or authorize certain actions or operations within the Icinga environment.
systemctl restart icingadb icinga2 icingadb-redis
Configure Firewall for Port 80 and Install Apache Web Server
sudo firewall-cmd --zone=public --add-port=80/tcp
sudo firewall-cmd --permanent --zone=public --add-port=80/tcp
zypper install --no-confirm apache2
sudo systemctl enable --now apache2
sudo systemctl enable --now icinga-director
Check Configuration Files
cat /etc/icinga2/constants.conf
cat /etc/icinga2/conf.d/api-users.conf
Add ‘rewrite’ in apache2 web server config, search fir string “APACHE_MODULES” & restart service
vi /etc/sysconfig/apache2
To enable the rewrite module in Apache, you can follow these steps:
- Open the
/etc/sysconfig/apache2file in a text editor likevi. - Locate the
APACHE_MODULESsection. - Add
rewriteto the list of modules within theAPACHE_MODULESvariable. It should look something like this:makefileCopy code APACHE_MODULES="...other_modules rewrite"Ensure that the module name is separated by spaces and doesn’t have any syntax errors. - Save the file and restart the Apache service for the changes to take effect.
Keep in mind that enabling modules in Apache should be done judiciously, based on your server’s specific requirements, as unnecessary modules might impact security or performance.
Improve parameter PHP
vi /etc/php7/apache2/php.ini
memory_limit = 256M
post_max_size = 64M
upload_max_filesize = 100M
max_execution_time = 300
default_charset = "UTF-8"
date.timezone = "Europe/Rome"
cgi.fix_pathinfo=0
Modifying the PHP configuration file (php.ini) for the Apache web server can be necessary to customize PHP’s behavior and settings based on specific requirements. Let’s discuss each parameter you’re adjusting:
memory_limit = 256M: Sets the maximum amount of memory PHP scripts are allowed to allocate. Increasing this value can help in executing memory-intensive scripts.post_max_size = 64M: Defines the maximum size of POST data that PHP will accept. This includes file uploads and form submissions. Adjusting this parameter allows larger data to be sent via POST requests.upload_max_filesize = 100M: Specifies the maximum size of an uploaded file. This parameter controls the maximum file size allowed for uploads through PHP forms.max_execution_time = 300: Sets the maximum time (in seconds) a script is allowed to run before it’s terminated. Useful for preventing long-running scripts from consuming excessive server resources.default_charset = "UTF-8": Defines the default character set to be used by PHP. Setting it to UTF-8 ensures better compatibility for handling different character encodings.date.timezone = "Europe/Rome": Specifies the default timezone for date and time functions in PHP. This ensures consistent handling of dates and times based on the specified timezone.cgi.fix_pathinfo=0: This setting relates to security. Setting it to0prevents PHP from potentially resolving the PATH_INFO security vulnerability.
After making these adjustments in the php.ini file, ensure to save the changes and then restart the Apache web server for the modifications to take effect. These changes optimize PHP’s behavior based on your server’s requirements, allowing for larger file uploads, increased memory allocation, longer script execution times, and improved character encoding handling.
systemctl restart apache2Access Web UI For Initial Setup
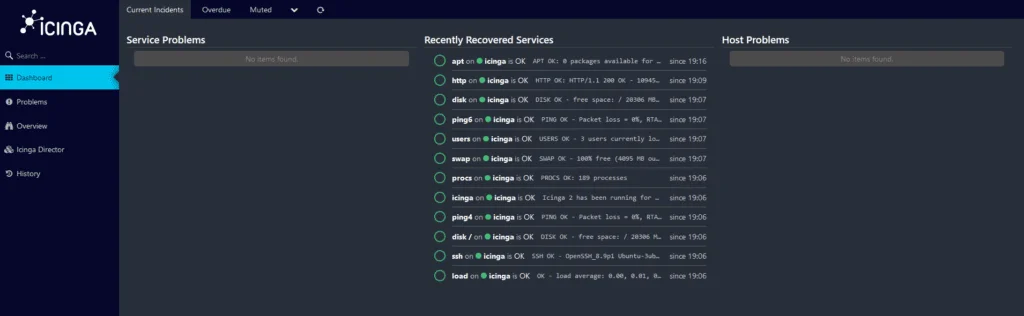
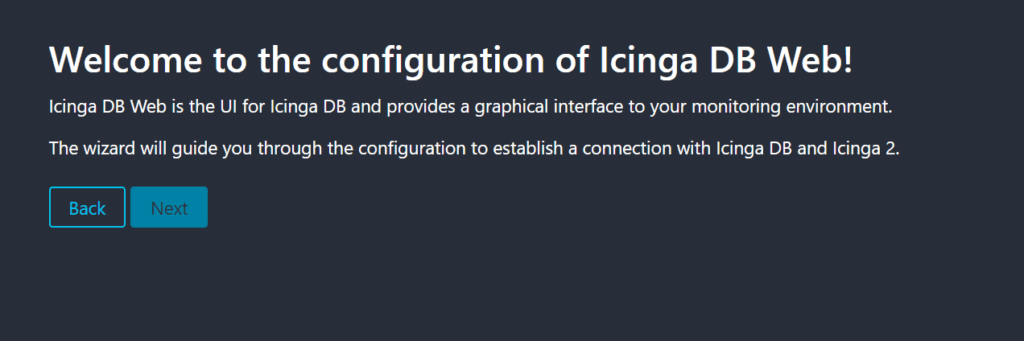
This page is your gateway to configuring and customizing your Icinga Web 2 installation. Through this wizard, you can tailor your monitoring web interface to match your unique requirements, including database settings, user authentication, visual preferences, and more. Make sure you change all hostname references to your server name or FQDN.
http://<server ip>/icingaweb2/setup
http://<server hostname>/icingaweb2/setup
http://<server fqdn>/icingaweb2/setup
This is the token that was generated when “icingacli setup token create” was issued. If it does not work you can re-execute the command or display the token.
icingacli setup token show
Next
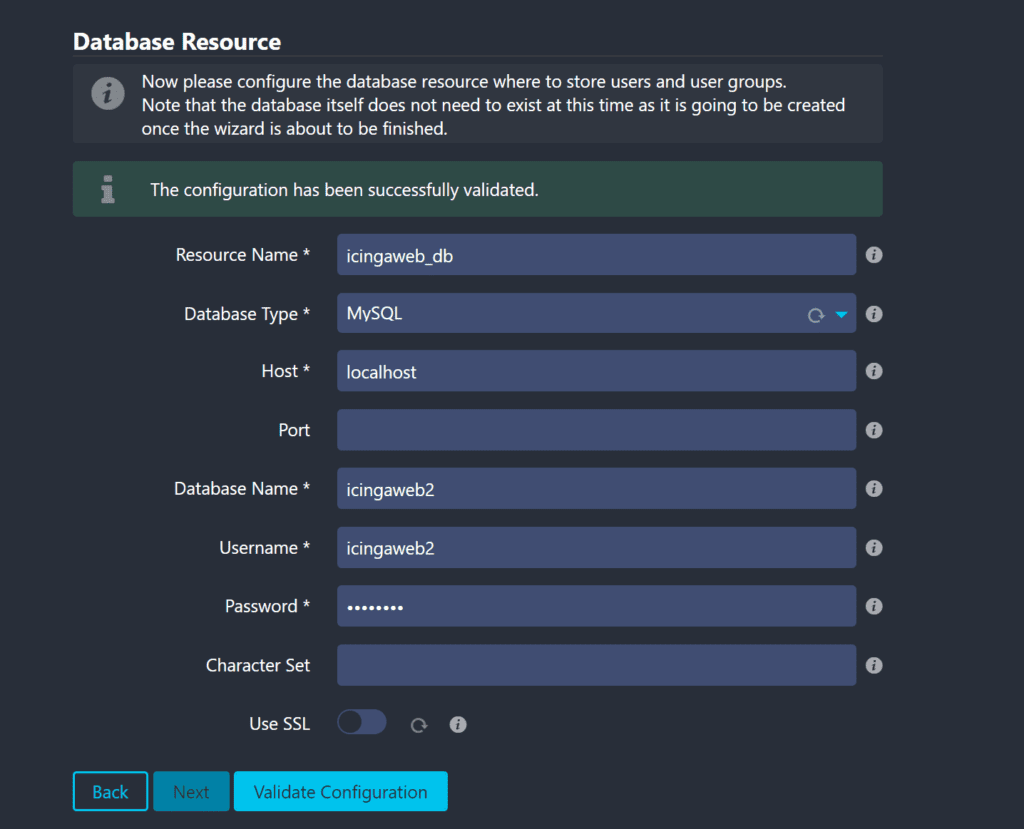
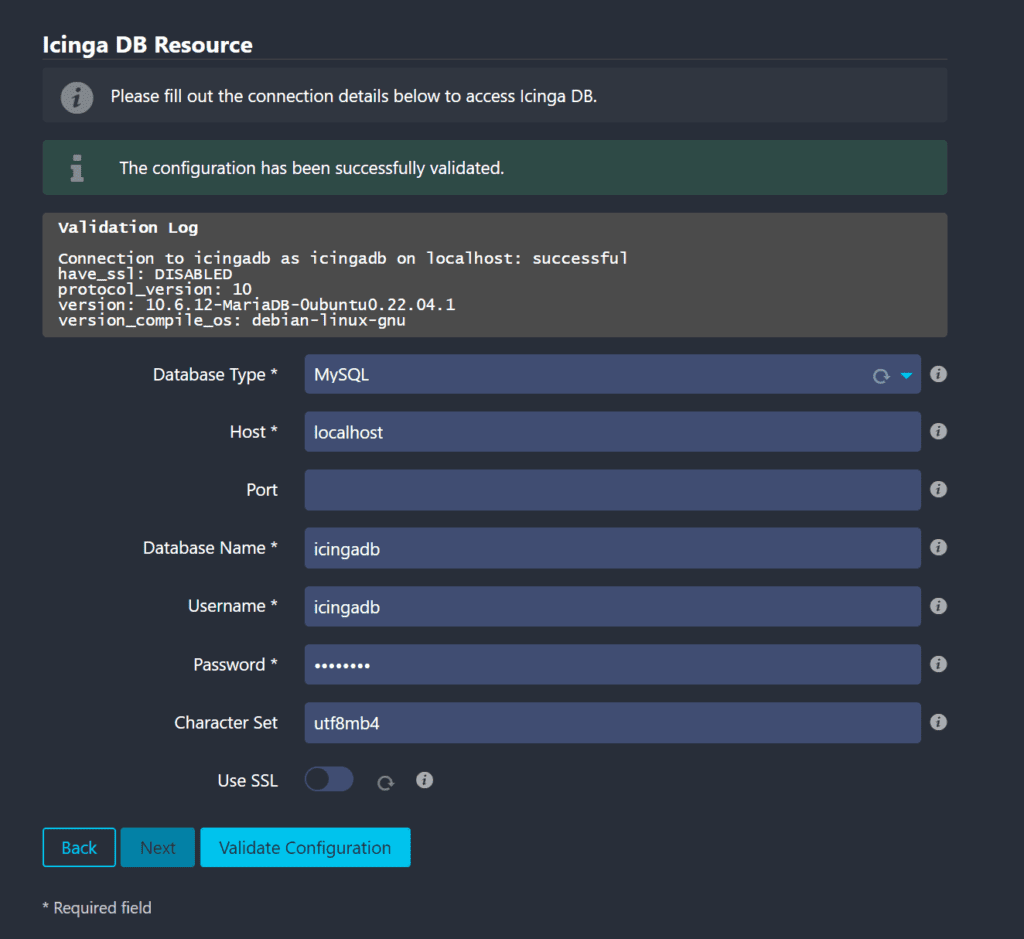
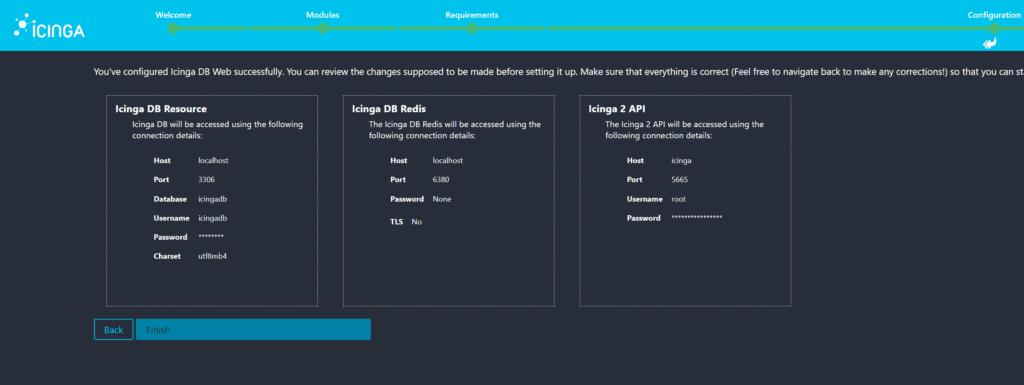
Input the required data for the Icinga Web 2 database created earlier.
Provide a name
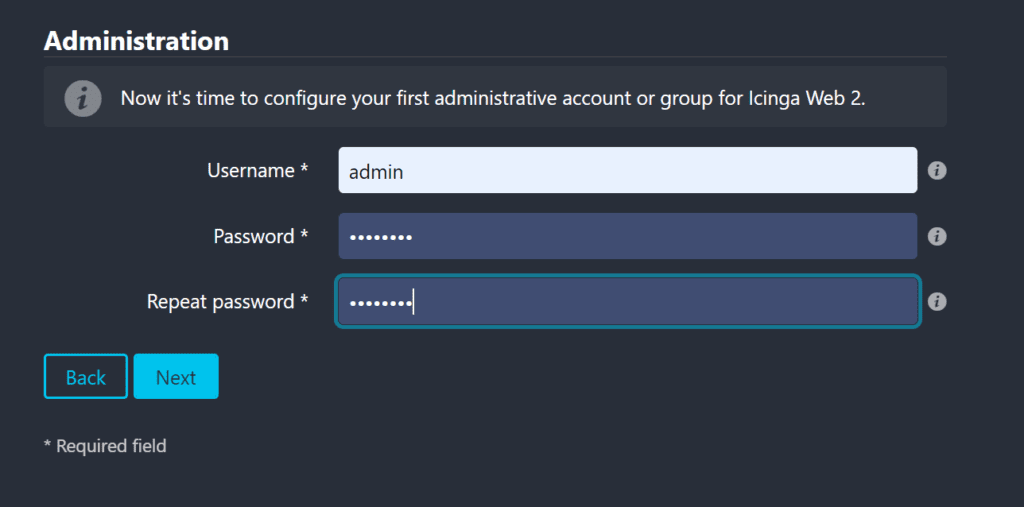
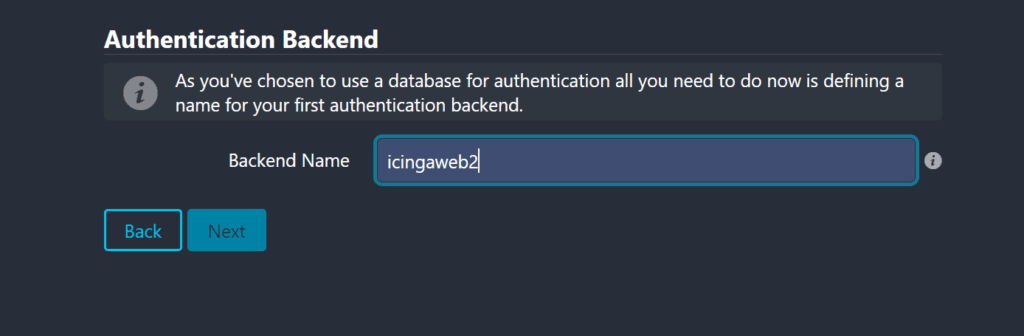
Create your super admin user
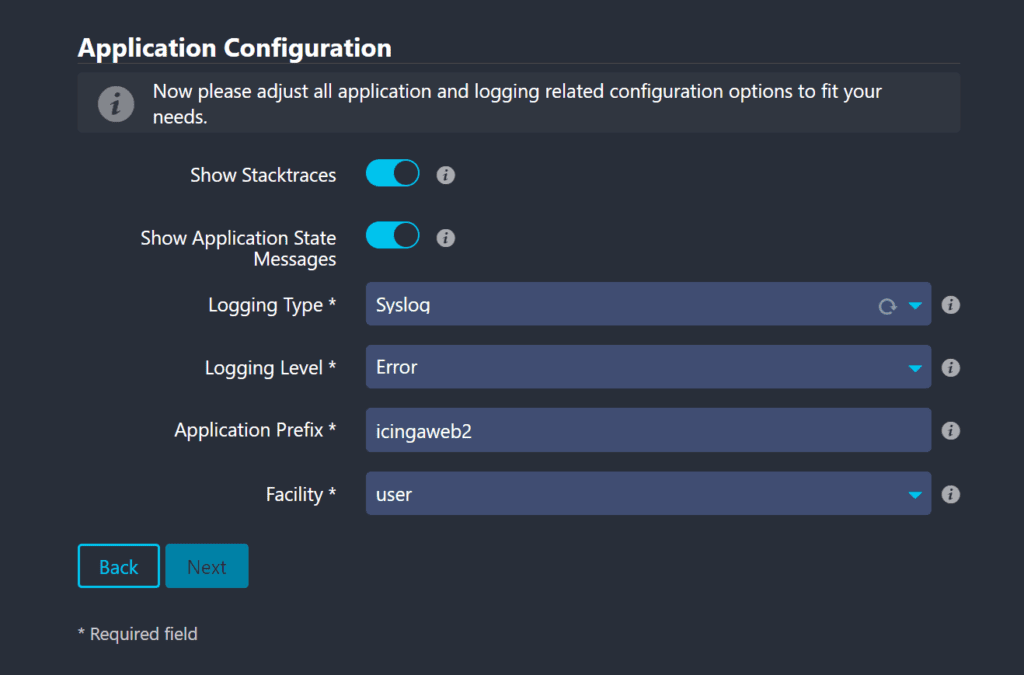
Leave defaults

Next
Next
Provide details and press Next
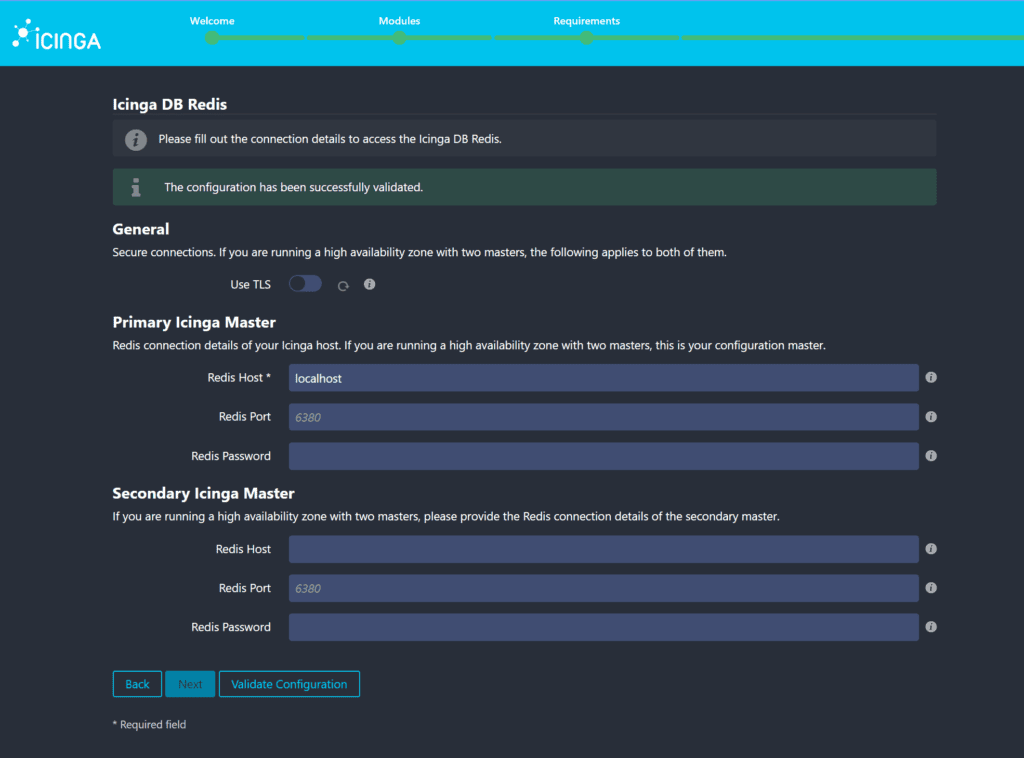
Provide the Redis host details and press next.
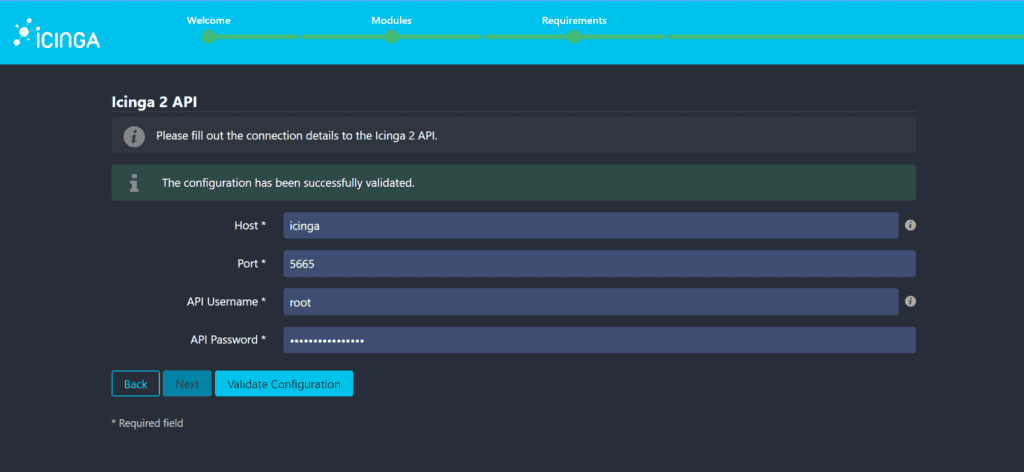
Input API credentials which can be found by executing the previous command:
cat /etc/icinga2/conf.d/api-users.confIf you have any issues, check the service statuses for the Icinga components and restart. Common issues are related to redis, icinga2 and icinga2db can be intercepted by checking the system log messages also.
Next
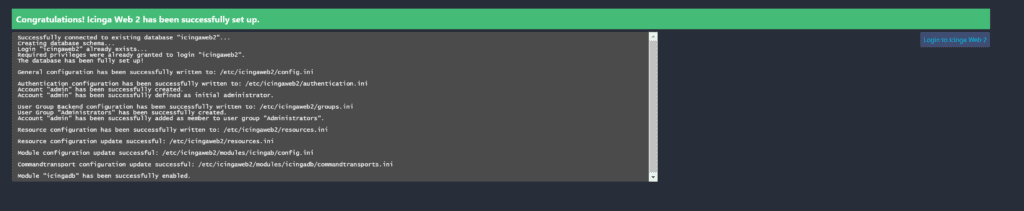
Click on the button to the right to access the login page.

Configure Director
Before doing anything lets configure Director, we will need to add the director database as a new resource and run it wizard.
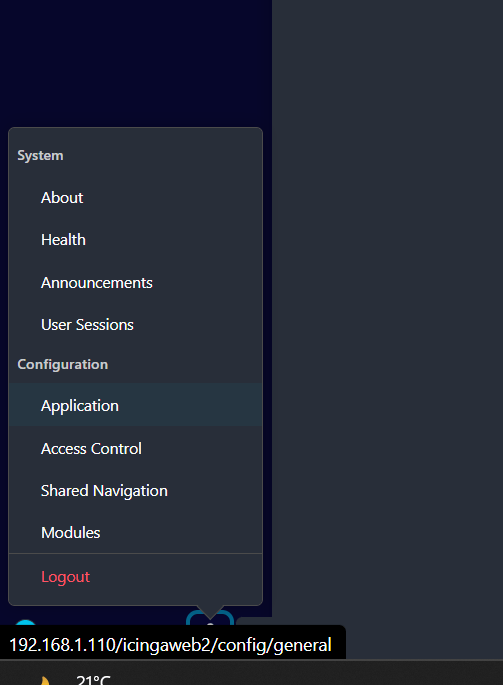
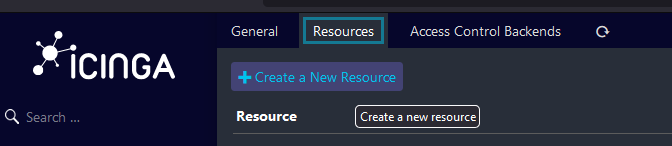
- Create a new resource for the Icinga Director database via the
Configuration → Application → Resourcesmenu. Please make sure that you configureutf8as encoding. - Select
Icinga Directordirectly from the main menu and you will be taken to the kickstart wizard. Follow the instructions and you are done!

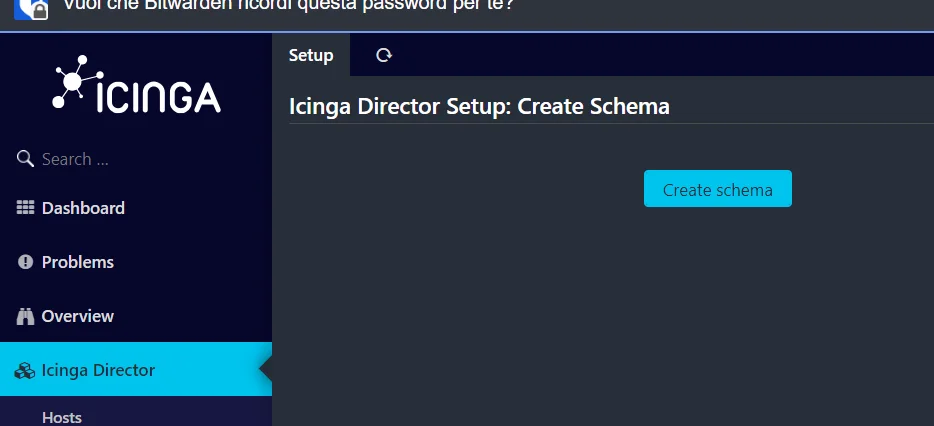
Now you can enable the Director by choosing this new resource as a target. You will then be asked to create the schema.
After schema has been created you will find multiple deployments pending that need to be pushed to the database.

Click on Deploy and that’s it! The system is installed and ready for action.