How to set up Prometheus, Prometheus Node Exporter, and Nginx with SSL and basic authentication on Ubuntu.
Prometheus is an open-source monitoring and alerting toolkit that is widely used for collecting and visualizing time-series data. It allows you to gain insights into the performance and health of your systems and applications. In a production environment, it’s essential to secure the Prometheus server, enable remote access through a reverse proxy, and add an additional layer of security with SSL and basic authentication. You can also use our ansible playbooks for a automated deployment.
This step-by-step guide will walk you through the process of setting up Prometheus and Prometheus Node Exporter, and then securing them with Nginx as a reverse proxy, SSL certificates, and basic authentication. By following this guide, you can ensure that your monitoring infrastructure is not only functional but also well-protected.
Prerequisites:
Before you begin, make sure you have the following prerequisites in place:
- A Linux-based server or virtual machine for hosting Prometheus and Prometheus Node Exporter.
- Administrative access to the server, allowing you to install software and make configuration changes.
- Basic knowledge of the Linux command line and package management.
- A domain or subdomain pointing to your server’s IP address for SSL certificate configuration (recommended).
Now, let’s dive into the step-by-step process of setting up Prometheus, Prometheus Node Exporter, and Nginx with SSL and basic authentication on a Ubuntu Server.
Installing Prometheus and Node Exporter
Update the package repositories and upgrade installed packages:
sudo apt update -y && sudo apt upgrade -yInstall Prometheus and Node Exporter:
sudo apt install prometheus -yCheck the status of the Prometheus service:
sudo service prometheus status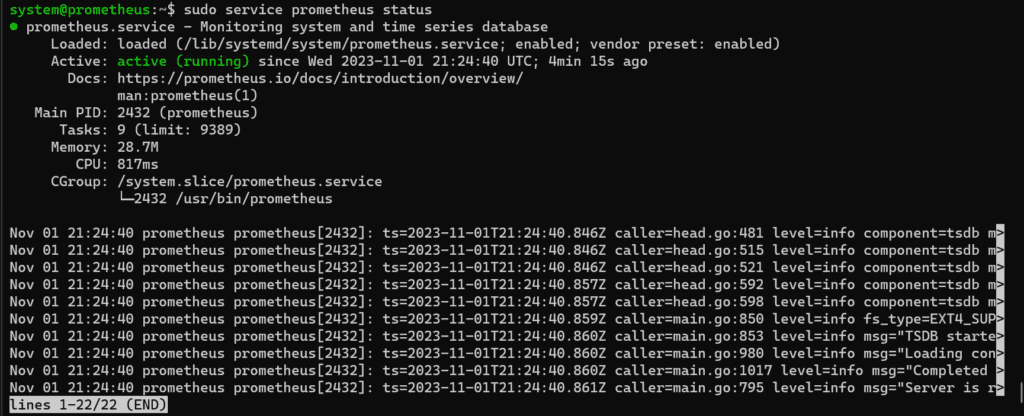
Check the status of the Prometheus Node Exporter service:
sudo service prometheus-node-exporter status
Check if the Prometheus user is running:
ps -u prometheus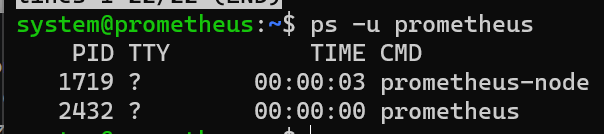
Check Web UIs
Prometheus provides web-based user interfaces to visualize and interact with monitoring data. In this section, you are instructed to check the web interfaces for both Prometheus Server and Prometheus Node Exporter. These interfaces are accessible through web browsers and allow you to monitor your systems and gather essential insights.
- Prometheus Server: The web UI for Prometheus Server can be accessed via the following URL: http://<IP or hostname>:9090 This URL will take you to the Prometheus Server’s web interface, where you can run queries, create alerts, and visualize collected metrics.
- Node Exporter: The web UI for Prometheus Node Exporter can be accessed through this URL: http://<IP or hostname>:9100 This URL will lead you to the Prometheus Node Exporter’s web interface, which provides detailed system-level metrics, such as CPU usage, memory consumption, and more.
Add Custom FQDN Name Resolution:
The next part of this section instructs you to add custom Fully Qualified Domain Names (FQDNs) for Prometheus. FQDNs are user-friendly domain names that map to specific IP addresses, making it easier to access services. In this case, you are creating custom FQDNs for your monitoring services.
- PROMETHEUS: You are adding custom FQDN entries for Prometheus. These entries ensure that when you use these domain names, they resolve to the IP address 192.168.1.XX. This is helpful for accessing Prometheus and Prometheus Node Exporter using user-friendly names instead of IP addresses. The custom FQDNs provided are:
prometheus.home.lab: This is the custom FQDN for Prometheus Server.prometheus-node.home.lab: This is the custom FQDN for Prometheus Node Exporter.
By adding these custom FQDNs to your system’s host file, you can use these names to access Prometheus and Prometheus Node Exporter in your browser, making it more convenient for monitoring and management. This is especially useful when working with multiple services or when you want to abstract away the underlying IP addresses for better organization and ease of access.
Moreover, these custom FQDNs play a crucial role in simplifying your Nginx setup. By configuring Nginx to listen to these custom FQDNs, you can access your monitoring services via HTTPS, simply by changing the FQDN in your browser, without needing to remember and specify different ports. This significantly enhances the user experience and makes it easier to secure your services with SSL encryption and basic authentication.
Configuring Nginx Reverse Proxy
Nginx is a powerful and highly popular open-source web server and reverse proxy server. It’s known for its performance, scalability, and the ability to efficiently handle web traffic, making it a versatile tool in the world of web hosting and networking. Beyond serving as a web server, Nginx also functions as a reverse proxy, which means it can forward client requests to backend servers and handle responses from those servers. This capability is particularly valuable for securing and simplifying access to services like Prometheus.
In the context of monitoring and security, Nginx is employed to protect Prometheus in the following ways:
- Security: Nginx acts as a security barrier between Prometheus and the outside world. By setting up Nginx as a reverse proxy, you can restrict direct access to Prometheus. This means that only authenticated and authorized users can access the monitoring data, adding a layer of security to your Prometheus setup.
- HTTPS (SSL/TLS): Nginx enables the use of SSL/TLS encryption for communications between clients and Prometheus. This ensures that data exchanged between the user’s browser and Prometheus is encrypted, safeguarding sensitive information from potential eavesdropping.
- Custom Domain Names: By configuring Nginx with custom Fully Qualified Domain Names (FQDNs), you can simplify how you access Prometheus. Instead of using different ports, you can use user-friendly domain names to access Prometheus services, making it more accessible and user-friendly.
- Basic Authentication: Nginx allows you to implement basic authentication, requiring users to enter a username and password before they can access Prometheus. This additional layer of security ensures that only authorized personnel can interact with your monitoring system.
In summary, Nginx serves as a robust shield for Prometheus, enhancing security, simplifying access, and ensuring that your monitoring infrastructure is well-protected and user-friendly. It is an essential component in creating a secure and efficient monitoring environment.
Install Nginx:
sudo apt install nginx -yCheck the status of the Nginx service:
sudo service nginx status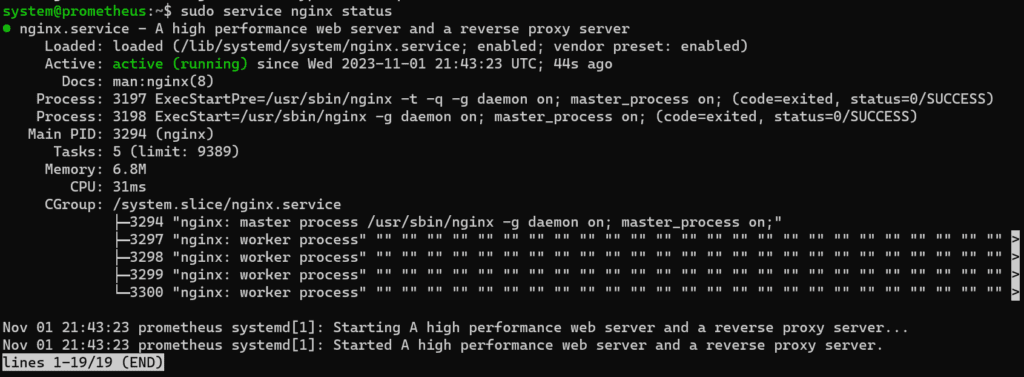
Navigate to the Nginx sites-enabled directory:
cd /etc/nginx/sites-enabled/Create a configuration file for Prometheus:
sudo vi prometheus Add the following configuration for Prometheus, adjust as needed
server {
   listen 80;
   listen [::]:80;
   server_name prometheus.home.lab;
   location / {
      proxy_pass http://localhost:9090/;
   }
}
The provided configuration block is written in the Nginx configuration language and represents a server block that defines how Nginx should handle incoming HTTP traffic for a server named “prometheus.home.lab.” Let’s break down each part of this configuration:
- server { … }: This is the main block that defines the server configuration. It encapsulates all the settings for how Nginx should handle requests for this server.
- listen 80;: This line specifies that Nginx should listen on port 80 for incoming HTTP requests. Port 80 is the default port for unencrypted HTTP traffic.
- listen [::]:80;: This line is for IPv6, indicating that Nginx should also listen on IPv6 addresses on port 80. This allows clients using IPv6 to connect to the server.
- server_name prometheus.home.lab;: The
server_namedirective defines the hostname (in this case, “prometheus.home.lab”) that Nginx will match against incoming HTTP requests to determine which server block to use. When a request comes in with the host header “prometheus.home.lab,” it will be directed to this server block. - location / { … }: The
locationblock is used to specify how Nginx should process requests to a specific location or path. In this case, it’s configured to handle requests to the root path (“/”). - proxy_pass http://localhost:9090/;: This directive tells Nginx to act as a reverse proxy. It forwards incoming requests to the specified backend server, in this case, “http://localhost:9090/.” The backend server is typically running Prometheus on port 9090 locally.
In summary, this Nginx configuration block defines a server named “prometheus.home.lab” that listens on both IPv4 and IPv6 on port 80. When it receives requests for this server with the hostname “prometheus.home.lab,” it forwards those requests to a local Prometheus server running on port 9090. This setup allows you to access Prometheus using the custom FQDN “prometheus.home.lab” and port 80 in your web browser, simplifying the access to Prometheus and potentially providing additional security and SSL features as configured in other parts of your Nginx setup.
Create a configuration file for Prometheus Node Exporter:
sudo vi prometheus-nodeAdd the following configuration for Prometheus Node Exporter, adjust as needed:
server {
   listen 80;
   listen [::]:80;
   server_name prometheus-node.home.lab;
   location / {
      proxy_pass http://localhost:9100/;
   }
}
Test Nginx configuration:
sudo nginx -tRestart Nginx to apply the changes:
sudo service nginx restartNow, with the Nginx configuration in place, it will effectively handle incoming requests from both Prometheus and Prometheus Node Exporter on the standard HTTP port 80. Based on the designated server blocks and their respective server names, Nginx will intelligently redirect these requests to the appropriate local services. This means that when you access Prometheus or Prometheus Node Exporter using their custom FQDNs, such as “prometheus.home.lab” and “prometheus-node.home.lab,” Nginx will ensure that the requests are directed to the correct internal services running on the specified ports, making access more user-friendly and organized while maintaining secure and efficient communication.
Setting Up HTTPS with Self-Signed Certificates
In this section, we will delve into the crucial steps of generating a self-signed SSL certificate and creating Diffie-Hellman parameters. SSL (Secure Sockets Layer) and its successor, TLS (Transport Layer Security), are cryptographic protocols that provide secure and encrypted communication over the internet. SSL certificates are essential for ensuring the confidentiality and integrity of data exchanged between clients and servers. While self-signed certificates may not be suitable for production use due to a lack of third-party validation, they are invaluable for securing internal services or for testing and development environments. Additionally, generating Diffie-Hellman parameters enhances the security of SSL/TLS connections, particularly when using the Diffie-Hellman key exchange protocol. In the upcoming steps, we will outline how to create a self-signed SSL certificate and generate Diffie-Hellman parameters to bolster the security of your web services.
Diffie-Hellman key exchange (or Diffie-Hellman, for short) doesn’t directly enhance an SSL certificate but is a critical component of the SSL/TLS (Secure Sockets Layer/Transport Layer Security) protocol that enhances the overall security of SSL/TLS-encrypted communications. SSL certificates and Diffie-Hellman serve different but complementary roles in securing communications over the internet.
Here’s how Diffie-Hellman enhances SSL/TLS:
- Key Exchange: In the SSL/TLS handshake process, one of the primary goals is to establish a secure session key that both the client and server can use for encrypting and decrypting data. This session key needs to be securely exchanged between the two parties without being exposed to potential eavesdroppers. Diffie-Hellman provides a secure method for this key exchange, allowing the client and server to independently generate a shared secret key without sending it over the network.
- Perfect Forward Secrecy (PFS): Diffie-Hellman is often used in SSL/TLS for achieving Perfect Forward Secrecy. PFS ensures that even if an attacker were to compromise a server’s private key at a later time, previously recorded encrypted sessions remain secure. This is because, in a Diffie-Hellman exchange, the private key is not used to directly encrypt the session key; instead, a unique session key is generated for each session, making it extremely difficult for an attacker to decrypt historical data.
- Key Strength: Diffie-Hellman allows for the negotiation of strong encryption keys during the SSL/TLS handshake. The security of the communication largely depends on the quality of the session key, and by using Diffie-Hellman, you can ensure that robust keys are used, making it more difficult for attackers to decipher the encrypted data.
While SSL certificates primarily serve to authenticate the identity of the server and enable secure connections via encryption, Diffie-Hellman enhances the security of the key exchange process within the SSL/TLS protocol. Together, they form a robust security framework that protects data in transit and ensures that the encryption keys are exchanged securely and with the added benefit of Perfect Forward Secrecy.
Generate a self-signed SSL certificate and Diffie-Hellman parameters:
sudo openssl req -x509 -nodes -days 1365 -newkey rsa:2048 -keyout /etc/ssl/private/nginx-selfsigned.key -out /etc/ssl/certs/nginxselfsigned.crt openssl dhparam -out /etc/ssl/certs/dhparam.pem 2048Edit the Nginx default configuration file:
sudo vi /etc/nginx/sites-available/defaultUpdate the file with the following SSL configuration:
server {
  listen 80 default_server;
  listen [::]:80 default_server;
  # SSL configuration
  listen 443 ssl default_server;
  listen [::]:443 ssl default_server;
  ssl_certificate /etc/ssl/certs/nginx-selfsigned.crt;
  ssl_certificate_key /etc/ssl/private/nginx-selfsigned.key;
  ssl_dhparam /etc/ssl/certs/dhparam.pem;
  }
Create SSL configurations for Prometheus and Prometheus Node Exporter
sudo vi /etc/nginx/sites-enabled/prometheus Add the following configuration for Prometheus:
server {
  listen 80;
  server_name prometheus.home.lab prometheus;
  return 301 https://$host$request_uri;
}
server {
  listen 443 ssl http2;
  server_name prometheus.home.lab prometheus;
  ssl_certificate /etc/ssl/certs/nginx-selfsigned.crt;
  ssl_certificate_key /etc/ssl/private/nginx-selfsigned.key;

  location / {
    proxy_pass http://localhost:9090;
    proxy_set_header Host $host;
  }
}
Create the SSL configuration for Prometheus Node Exporter:
sudo vi /etc/nginx/sites-enabled/prometheus-node Add the following configuration for Prometheus Node Exporter:
server {
  listen 80;
  server_name prometheus-node.home.lab prometheus-node;
  return 301 https://$host$request_uri;
}
server {
  listen 443 ssl http2;
  server_name prometheus-node.home.lab prometheus-node;
  ssl_certificate /etc/ssl/certs/nginx-selfsigned.crt;
  ssl_certificate_key /etc/ssl/private/nginx-selfsigned.key;
  location / {
    proxy_pass http://localhost:9100;
    proxy_set_header Host $host;
  }
}
Test the Nginx configuration:
sudo nginx -tRestart Nginx to apply the SSL configurations:
sudo service nginx restartAdding Basic Authentication
Install Apache utilities for htpasswd:
sudo apt install apache2-utils -yCreate an admin user for basic authentication:
sudo htpasswd -c /etc/nginx/.htpasswd adminEdit the Prometheus Nginx configuration to add basic authentication:
sudo vi /etc/nginx/sites-enabled/prometheus Update the Prometheus Nginx configuration block as follows (2 lines):
server {
  listen 80;
  server_name prometheus.home.lab prometheus;
  return 301 https://$host$request_uri;
}
server {
  listen 443 ssl http2;
  server_name prometheus.home.lab prometheus;
  ssl_certificate /etc/ssl/certs/nginx-selfsigned.crt;
  ssl_certificate_key /etc/ssl/private/nginx-selfsigned.key;
  auth_basic "Protected Area";
  auth_basic_user_file /etc/nginx/.htpasswd;

  location / {
    proxy_pass http://localhost:9090;
    proxy_set_header Host $host;
  }
}
Test the Nginx configuration:
sudo nginx -tRestart Nginx to apply the basic authentication:
sudo service nginx restartBlocking Default Ports for Remote Access
Install iptables-persistent to manage firewall rules:
sudo apt install iptables-persistent -yAllow local access to Prometheus and Prometheus Node Exporter ports (9090 and 9100):
iptables -A INPUT -p tcp -s localhost --dport 9090 -j ACCEPT
iptables -A INPUT -p tcp -s localhost --dport 9100 -j ACCEPT
Block remote access to Prometheus and Prometheus Node Exporter ports:
iptables -A INPUT -p tcp --dport 9090 -j DROP
iptables -A INPUT -p tcp --dport 9100 -j DROP
List the current firewall rules:
iptables -LSave the iptables rules:
iptables-save > /etc/iptables/rules.v4
iptables-save > /etc/iptables/rules.v6
Conclusion:
With the completion of the steps outlined in this guide, you now have a secure and password-encrypted Prometheus Server, fortified with Nginx as a reverse proxy, SSL encryption, and basic authentication. Your monitoring infrastructure is not only more robust but also user-friendly, thanks to custom Fully Qualified Domain Names (FQDNs) simplifying access.
But the journey doesn’t end here. To further expand your monitoring capabilities, you can now seamlessly install Grafana on the same server, securing it using the same trusted Nginx setup. Grafana complements Prometheus by providing advanced visualization and dashboarding features, offering you a comprehensive monitoring and data analysis platform.
To expedite the setup process, we’ve created an Ansible playbook. These playbooks allows for the rapid deployment of Prometheus, Prometheus Node Exporter, Nginx, and Grafana, all with pre-configured security measures. With these tools at your disposal, you can effectively monitor your systems, gather insights, and ensure the reliability and performance of your infrastructure. The combination of Prometheus, Grafana, and a secure Nginx setup equips you with a robust and well-protected monitoring solution, empowering you to make informed decisions and maintain the health of your systems.