How to install Icinga 2 and Director on Ubuntu Server 22.04
Icinga is a versatile and robust open-source monitoring tool designed to keep a watchful eye on your IT infrastructure, ensuring its reliability and performance. It’s your ultimate ally in proactively identifying and resolving issues before they impact your operations.
At its core, Icinga 2 delivers real-time monitoring capabilities, allowing you to monitor a wide range of network devices, servers, and applications. But that’s just the beginning.
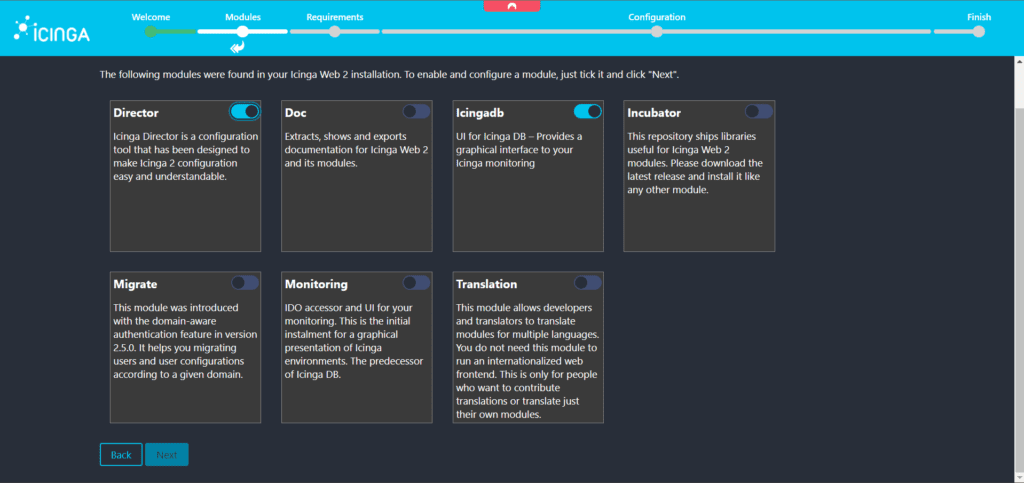
Icinga Director takes monitoring to new heights by simplifying configuration management. This powerful component provides a user-friendly interface for managing and automating complex configurations, making it easier than ever to tailor Icinga to your specific needs.
With Icinga Director, you can:
- Effortlessly create and manage hosts and services: Define what you want to monitor without getting lost in configuration files.
- Schedule automated checks: Set up routine checks to ensure your systems are always in top shape.
- Visualize data: Gain insights with customizable dashboards and reports.
- Enhance alerting: Fine-tune alerting to notify you when it matters most.
- Integrate with other tools: Seamlessly connect Icinga with your existing IT ecosystem.
In this tutorial, we’ll guide you through the process of installing Icinga 2 and Director on your Ubuntu Server 22.04, with an updated approach to ensure a smooth setup in under 15 minutes. Dive into the world of efficient system monitoring and unlock the full potential of Icinga and Director.
Ready to get started? Let’s make monitoring your IT infrastructure a breeze.
Update Ubuntu
sudo suThe command “sudo su” is used in the Bash shell to gain superuser or root privileges, allowing the user to execute commands and access files that are restricted to normal users.
apt update && sudo apt upgrade -yThis updates the list of available packages and upgrades the current system by installing the latest versions of all packages. The -y flag automatically answers “yes” to any prompts that may appear during the upgrade process.
apt install apt-transport-https wget gnupg -yThis is a bash command to install the apt-transport-https, wget, and gnupg packages on a Debian or Ubuntu system using the apt package manager.
Add Icinga Package Repository
We recommend using ICINGA official repositories. Here’s how to add it to your system:
wget -O - https://packages.icinga.com/icinga.key | gpg --dearmor -o /usr/share/keyrings/icinga-archive-keyring.gpg

wget -O - https://packages.icinga.com/icinga.key | apt-key add -
This is a command in the Bash shell language. It downloads the Icinga GPG key from a specified URL and saves it in the /usr/share/keyrings/icinga-archive-keyring.gpg file.
. /etc/os-release; if [ ! -z ${UBUNTU_CODENAME+x} ]; then DIST="${UBUNTU_CODENAME}"; else DIST="$(lsb_release -c| awk '{print $2}')"; fi; \
 echo "deb https://packages.icinga.com/ubuntu icinga-${DIST} main" > \
 /etc/apt/sources.list.d/${DIST}-icinga.list
 echo "deb-src https://packages.icinga.com/ubuntu icinga-${DIST} main" >> \
 /etc/apt/sources.list.d/${DIST}-icinga.list
This command is a shell script that is used to add an Icinga software repository to the list of package sources on an Ubuntu-based system. Let’s break down what it does step by step:
. /etc/os-release;: This part of the command sources the/etc/os-releasefile, which contains information about the operating system distribution. It allows the script to access variables defined in that file.if [ ! -z ${UBUNTU_CODENAME+x} ]; then DIST="${UBUNTU_CODENAME}"; else DIST="$(lsb_release -c| awk '{print $2}')"; fi;: This part of the command checks if the variableUBUNTU_CODENAMEis defined. If it is defined and not empty, it sets theDISTvariable to its value. IfUBUNTU_CODENAMEis not defined or empty, it uses thelsb_release -ccommand to extract the codename of the Ubuntu release (e.g., “bionic,” “focal,” etc.) and assigns it to theDISTvariable.echo "deb [signed-by=/usr/share/keyrings/icinga-archive-keyring.gpg] https://packages.icinga.com/ubuntu icinga-${DIST} main" > /etc/apt/sources.list.d/${DIST}-icinga.list: This part of the command creates a new file in the/etc/apt/sources.list.d/directory with a name that includes the Ubuntu release codename. It writes a repository configuration line for Icinga, specifying the URL, distribution (which is set to the previously determinedDIST), and component (“main”). The[signed-by=/usr/share/keyrings/icinga-archive-keyring.gpg]part indicates that the repository is signed with the specified GPG key.echo "deb-src [signed-by=/usr/share/keyrings/icinga-archive-keyring.gpg] https://packages.icinga.com/ubuntu icinga-${DIST} main" >> /etc/apt/sources.list.d/${DIST}-icinga.list: This line appends a similar configuration line to the same file for source packages (denoted by “deb-src”).
In summary, this command is used to dynamically generate an Icinga repository configuration file for the appropriate Ubuntu release and add it to the system’s list of package sources, making Icinga packages available for installation and updates on the system.
Install Icinga 2
To install Icinga 2, simply utilize your distribution’s package manager to install the ‘icinga2’ package. Please ensure that you execute the following commands with root permissions unless otherwise specified.
apt-get update
apt -y install icinga2
Add Check Plugins
Icinga 2 relies on external plugins to perform checks on services. The Monitoring Plugins Project offers a comprehensive collection of plugins compatible with Icinga 2, enabling you to assess the health of various services.
These plugins are essential for ensuring that the example configuration functions seamlessly right from the start.
apt install monitoring-plugins -ySetup Icinga 2 API
Nearly every Icinga 2 setup necessitates the Icinga 2 API, as it serves as the cornerstone for multiple crucial functions. Icinga Web relies on it for connectivity, Icinga DB depends on it, and it plays a pivotal role in facilitating cluster communication for highly available and distributed configurations.
icinga2 api setup
systemctl restart icinga2
Setup Icinga DB
Icinga DB is a vital component within the Icinga ecosystem, designed to facilitate the seamless publication, synchronization, and visualization of monitoring data. It comprises the following key elements:
- Icinga 2 with ‘icingadb’ Feature: This component plays a pivotal role in the process by publishing a wide range of monitoring data to a Redis server. This data encompasses various critical aspects, including configuration updates, runtime changes, check results, state transitions, downtimes, acknowledgments, notifications, and events such as flapping. Essentially, Icinga 2, with the ‘icingadb’ feature enabled, acts as the data publisher within the ecosystem.
- Icinga DB Daemon: Operating in the background, the Icinga DB daemon acts as a data intermediary, ensuring the smooth synchronization of information between the Redis server and a dedicated database. This synchronization is essential for preserving a reliable and up-to-date record of your monitoring data.
- Icinga Web with Icinga DB Web Module: Completing the picture, Icinga Web, with the Icinga DB Web module activated, serves as the user interface for interacting with your monitoring data. It connects seamlessly to both the Redis server and the database, providing users with real-time access to the most current and accurate information. This enables efficient monitoring, reporting, and troubleshooting within the Icinga ecosystem.
In essence, Icinga DB orchestrates the flow of monitoring data, ensuring it is not only efficiently collected but also readily available for analysis and visualization, thus empowering organizations to maintain the health and reliability of their IT infrastructure.
apt install icingadb
icinga2 feature enable icingadb
Setup Redis Server
Redis, which stands for Remote Dictionary Server, is an open-source, in-memory data store or key-value store. It is often referred to as a “data structure server” because it can store and manipulate a wide variety of data structures, including strings, lists, sets, sorted sets, hashes, and more. Redis is known for its exceptional speed and efficiency in data retrieval, making it a popular choice for caching, real-time analytics, messaging systems, and various other use cases.
In the context of Icinga, Redis is used as a critical component to facilitate the efficient flow of monitoring data within the Icinga ecosystem. Here’s how Redis is used in Icinga:
- Data Publishing from Icinga 2: Icinga 2, the core monitoring engine in the Icinga stack, can be configured to publish monitoring data to a Redis server. This data includes a wide range of information such as configuration updates, runtime changes, check results, state transitions, downtimes, acknowledgments, notifications, and events like flapping. Redis acts as a high-speed buffer that receives and temporarily stores this data.
- Efficient Data Storage: Redis excels at quickly storing and retrieving data in memory. This is crucial in monitoring scenarios where real-time data access is essential. The data stored in Redis serves as a temporary repository that allows Icinga components to efficiently access and process information without significant delays.
- Icinga DB Synchronization: The Icinga DB daemon is responsible for synchronizing data between the Redis server and a dedicated database. It ensures that the monitoring data stored in Redis is periodically and reliably transferred to a more persistent storage layer. This synchronization is crucial for maintaining a consistent and historical record of monitoring data.
- Real-Time Access via Icinga Web: Icinga Web, the web-based user interface for Icinga, is configured to connect to both the Redis server and the database. This allows users to access real-time monitoring data through the web interface, providing them with the most up-to-date information on the state of their infrastructure. Users can view alerts, performance metrics, and other critical monitoring data in real time.
In summary, Redis is an integral part of the Icinga ecosystem, serving as a high-speed, in-memory data buffer that enables efficient data sharing and access among various Icinga components. Its role is essential in ensuring that monitoring data is readily available for analysis, visualization, and real-time decision-making within the Icinga monitoring framework.
apt install icingadb-redis -y
systemctl enable --now icingadb-redis-server
systemctl restart icingadb-redis
Setup MariaDB
In the Icinga ecosystem, both MariaDB and Redis are used to complement each other, each serving a specific purpose in handling monitoring data. Here’s how they work together:
- Redis as a Data Buffer: Redis is primarily used as a high-speed, in-memory data buffer. Icinga 2, the core monitoring engine, is configured to publish monitoring data to a Redis server. This data includes real-time information such as configuration updates, check results, state changes, alerts, and more. Redis stores this data temporarily in memory.
- Efficient Data Retrieval: Redis excels at quickly storing and retrieving data, making it ideal for real-time data access. Icinga components, including Icinga Web and other tools, can efficiently access this data from Redis for immediate visualization and decision-making. Users can see the latest status of their infrastructure in real time through the web interface.
- Icinga DB Synchronization: The Icinga DB daemon comes into play as a mediator between Redis and the MariaDB database. It periodically synchronizes the data stored in Redis with the MariaDB database. This synchronization ensures that the monitoring data collected in real time is also persisted in a more permanent storage layer provided by MariaDB.
- Persistent Storage in MariaDB: MariaDB serves as the long-term, persistent storage solution for monitoring data. While Redis stores data in-memory for quick access, MariaDB stores data on disk, providing durability and a historical record of monitoring information. The Icinga IDO (Icinga Data Output) feature of Icinga 2 stores data in MariaDB, making it available for historical analysis, reporting, and auditing purposes.
- Historical Data Access: Icinga Web, when users need to access historical data or generate reports, queries the MariaDB database. This allows users to view historical performance trends, generate reports, and perform in-depth analysis of past monitoring data.
In summary, Redis and MariaDB work together to create a comprehensive monitoring solution within the Icinga ecosystem. Redis handles real-time data storage and retrieval, enabling immediate access to monitoring information. Meanwhile, MariaDB provides durable, long-term storage of historical data, configuration details, and more. This combination ensures that Icinga can meet the demands of both real-time monitoring and historical analysis in a highly efficient and reliable manner.
sudo apt install mariadb-server -y
sudo mysql_secure_installation
Icinga Databases Creation
In the Icinga ecosystem, there are several databases that play distinct roles and are used for different purposes. Here’s an overview of the IcingaDB, Icinga Web 2, and Director databases:
- IcingaDB Database:
- Role: The IcingaDB database, often referred to as the IDO (Icinga Data Output) database, is a crucial component in the Icinga monitoring stack.
- Purpose:
- Storage: It serves as a storage repository for storing historical monitoring data, including check results, state changes, notifications, and other monitoring-related information.
- Reporting and Analysis: The IcingaDB database enables you to generate reports, perform historical data analysis, and visualize long-term performance trends.
- Creation: This database is typically created during the installation and configuration of Icinga 2. You configure Icinga 2 to use a specific database server (e.g., MariaDB or PostgreSQL), and then Icinga 2 populates this database with monitoring data.
- Icinga Web 2 Database:
- Role: The Icinga Web 2 database is used by Icinga Web 2, the web-based user interface for Icinga, to store configuration details, user preferences, and other application-specific data.
- Purpose:
- Configuration Storage: Icinga Web 2 stores its configuration, including user roles, permissions, and dashboards, in this database.
- User Preferences: User-specific settings and preferences, such as dashboard layouts and themes, are also stored here.
- Creation: During the installation and setup of Icinga Web 2, you are typically prompted to configure a database backend, such as SQLite, MySQL, or PostgreSQL, which Icinga Web 2 then uses for its data storage.
- Director Database:
- Role: The Director database is used by the Icinga Director module, an add-on for Icinga Web 2, to manage and store configuration data related to Icinga monitoring.
- Purpose:
- Configuration Management: The Director module allows users to define and manage complex monitoring configurations, including hosts, services, templates, and notification rules.
- Workflow Automation: It provides a user-friendly interface for creating and editing configuration objects, automating the generation of Icinga 2 configuration files.
- Creation: When you install and configure the Icinga Director module within Icinga Web 2, you are typically asked to set up a database backend (e.g., MySQL or PostgreSQL) for storing Director-specific configuration data.
In summary, the IcingaDB (IDO) database is primarily responsible for storing historical monitoring data, the Icinga Web 2 database is used for Icinga Web 2 application data, and the Director database is specifically used for managing and storing configuration data related to Icinga monitoring through the Icinga Director module. These databases play distinct roles in the Icinga ecosystem, ensuring the efficient operation of various components and the seamless management of your monitoring infrastructure.
mysql -u root -p
CREATE DATABASE icingadb;
CREATE USER 'icingadb'@'localhost' IDENTIFIED BY 'CHANGEME';
GRANT ALL ON icingadb.* TO 'icingadb'@'localhost';

CREATE DATABASE icingaweb2;
GRANT ALL ON icingaweb2.* TO icingaweb2@localhost IDENTIFIED BY 'CHANGEME';
quit
mysql -u root -p icingadb </usr/share/icingadb/schema/mysql/schema.sqlThis command is used to execute a MySQL script (schema.sql) and apply it to a MySQL database called “icingadb.” Let’s break down the components of this command:
mysql: This is the command-line client for MySQL, a popular relational database management system.-u root: This part specifies the MySQL user to be used for the operation. In this case, it’s “root,” which is typically the superuser with full privileges.-p: This option tells MySQL to prompt for the password of the specified user (“root” in this case). After entering this command, MySQL will wait for you to provide the password.icingadb: This is the name of the MySQL database to which you want to apply the SQL script.</usr/share/icingadb/schema/mysql/schema.sql: This part of the command uses input redirection (<) to take the contents of the specified SQL script file and feed it to the MySQL command. In this case, the SQL script file is located at/usr/share/icingadb/schema/mysql/schema.sql.
Here’s how the command works:
- You execute the
mysqlcommand with the specified options. - MySQL prompts you to enter the password for the “root” user. After entering the correct password, MySQL gains access to the MySQL server.
- MySQL reads the SQL commands from the
schema.sqlfile and executes them in the “icingadb” database. These commands typically contain table creation statements, schema definitions, and other database-related instructions. - Once MySQL has processed all the commands in the
schema.sqlfile, the database schema for the “icingadb” database is created or updated according to the instructions in the SQL script.
This step is essential for setting up the necessary database schema required for IcingaDB to store monitoring data efficiently. It defines the structure of tables, indexes, and relationships needed for the Icinga monitoring system to function correctly.
mysql -e "CREATE DATABASE director CHARACTER SET 'utf8';
  CREATE USER director@localhost IDENTIFIED BY 'CHANGEME';
  GRANT ALL ON director.* TO director@localhost;"
In summary, this series of MySQL commands is used to create a new MySQL database called “director,” create a user named “director” with a specified password, and grant that user full access to the “director” database. This is typically part of the setup process for the Icinga Director module, which requires its own database and user with appropriate permissions to manage monitoring configurations efficiently.
systemctl enable --now icingadb
systemctl restart icingadb
systemctl restart icinga2
Setup Icinga Web 2
apt-get install icingaweb2 libapache2-mod-php icingacli -y
apt-get install icingadb-web
Install Director
apt install icinga-director -yFix Permissions
chmod -R 775 /var/lib/icingaweb2
chmod -R 775 /etc/icingaweb2
Setup Icinga PDF Reporting
sudo apt install imagemagick imagemagick-doc -y
sudo apt-get install php-imagick -y
sudo add-apt-repository ppa:ondrej/php
sudo apt install imagemagick php7.2-Imagick -y
apt upgrade -y
The provided commands are used to install the ImageMagick software and its related PHP extension, php-imagick, on a Linux system, specifically Ubuntu. ImageMagick is a popular open-source software suite used for creating, editing, and converting images, while php-imagick is a PHP extension that provides integration with ImageMagick, allowing PHP scripts to manipulate images using ImageMagick’s functionalities.
Let’s break down each command and explain how Icinga may use these components:
sudo apt install imagemagick imagemagick-doc -y: This command installs the ImageMagick software package along with its documentation. ImageMagick is often used in web applications, including monitoring solutions like Icinga, to process and generate images, such as graphs and charts that might be used in reporting and visualization of monitoring data.sudo apt-get install php-imagick -y: This command installs the PHP extension called “php-imagick.” PHP extensions are add-ons that enhance the functionality of PHP. In this case, php-imagick allows PHP scripts to interact with ImageMagick and perform image manipulation tasks programmatically. Icinga may use this extension to generate dynamic images or thumbnails for its web interface.sudo add-apt-repository ppa:ondrej/php: This command adds a Personal Package Archive (PPA) repository maintained by Ondřej Surý, which provides updated PHP packages. This step is necessary to obtain the latest versions of PHP packages, including php-imagick.sudo apt install imagemagick php7.2-Imagick -y: This command installs specific versions of ImageMagick and php-imagick that are compatible with PHP 7.2. It ensures that the correct versions of these packages are installed for the PHP version in use.apt upgrade -y: Finally, this command performs a system upgrade to ensure that all packages, including the newly installed ones, are up to date.
In the context of Icinga, ImageMagick and the php-imagick extension may be used for various purposes, including:
- Graphical Data Visualization: Icinga may generate graphs and charts to visualize monitoring data trends, and ImageMagick could be used to create or modify these images.
- Custom Notifications: Image manipulation could be part of custom notification scripts to create visually informative messages or alerts.
- Thumbnail Generation: When displaying images or icons in the web interface, Icinga may use ImageMagick to generate thumbnails or resize images on-the-fly.
These components enhance Icinga’s capabilities to provide a richer and more interactive monitoring experience by incorporating image processing and manipulation capabilities into its features.
Completing Setup
systemctl enable --now icingadb
systemctl restart icingadb icinga2 icingadb-redis
cat /etc/icinga2/conf.d/api-users.conf
icingacli setup config directory --group icingaweb2;
icingacli setup token create;
systemctl restart icingadb icinga2 icingadb-redis:- Scope: This command is focused on restarting critical services within your Icinga monitoring environment.
- Explanation:
icingadb: This service is responsible for handling the storage and retrieval of monitoring data in IcingaDB, a crucial component for long-term data retention and analysis.icinga2: Icinga 2 is the core monitoring service responsible for actively monitoring hosts, services, and generating alerts.icingadb-redis: Redis is often used for caching and buffering monitoring data, helping improve real-time data retrieval performance.
- Purpose: The restart action ensures that any recent configuration changes or updates to these services are applied and that the services are running correctly. It helps maintain the health and reliability of your monitoring system.
cat /etc/icinga2/conf.d/api-users.conf:- Scope: This command involves inspecting the contents of the “api-users.conf” configuration file within Icinga 2.
- Explanation:
api-users.conf: This configuration file typically defines users and their permissions for accessing the Icinga 2 API. It specifies who can interact with the Icinga API and what actions they are allowed to perform.
- Purpose: By examining this file, you can review and verify the current API user configurations. It’s essential for understanding and managing access to your Icinga monitoring system through the API.
icingacli setup config directory --group icingaweb2:- Scope: This command configures the directory where Icinga Web 2 stores its configuration files.
- Explanation:
icingaweb2: This is the web-based user interface for Icinga, allowing users to manage and visualize monitoring data.
- Purpose: Configuring the directory ensures that Icinga Web 2 knows where to locate and store its configuration files. It’s necessary for the correct operation of the web interface.
icingacli setup token create:- Scope: This command generates an authentication token.
- Explanation:
Authentication Token: Authentication tokens are used for secure authentication and authorization within Icinga, often used to restrict access to sensitive parts of the monitoring system.
- Purpose: The token creation enhances security by providing a secure means of authentication. It can be used to ensure that only authorized individuals or systems can access and interact with various components of your Icinga infrastructure.
These commands collectively contribute to the proper operation, security, and configuration of your Icinga monitoring environment, covering aspects such as service management, API user configuration, web interface setup, and authentication security.
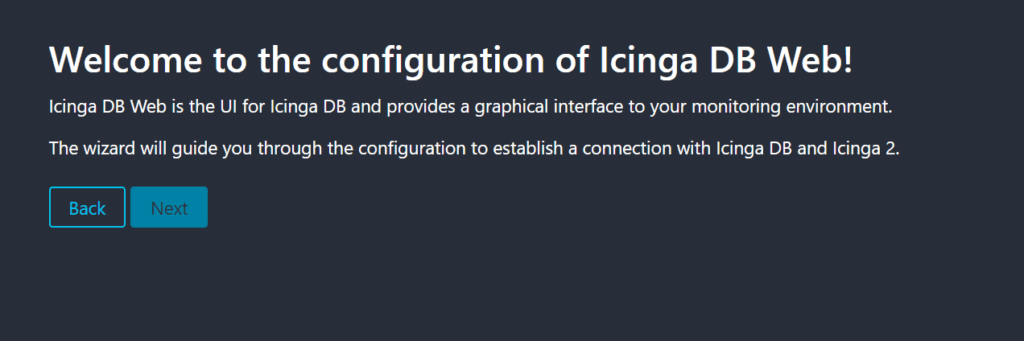
Access Web UI For Initial Setup
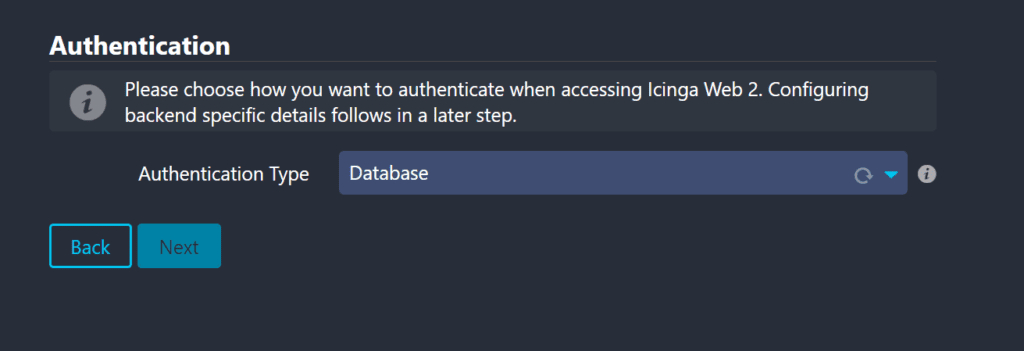
This page is your gateway to configuring and customizing your Icinga Web 2 installation. Through this wizard, you can tailor your monitoring web interface to match your unique requirements, including database settings, user authentication, visual preferences, and more.
https://<server ip>/icingaweb2/setup
https://<server hostname>/icingaweb2/setup
https://<server fqdn>/icingaweb2/setup
This is the token that was generated when “icingacli setup token create” was issued. If it does not work you can re-execute the command or display the token.
icingacli setup token show
Next
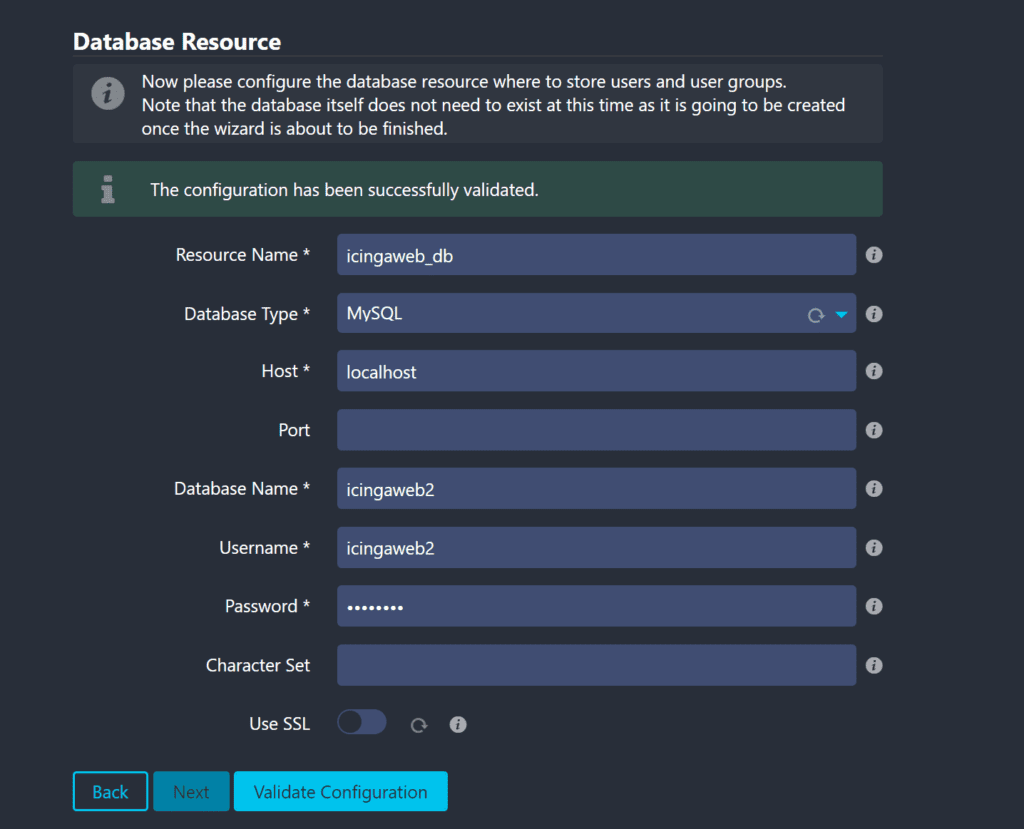
Input the required data for the Icinga Web 2 database created earlier.
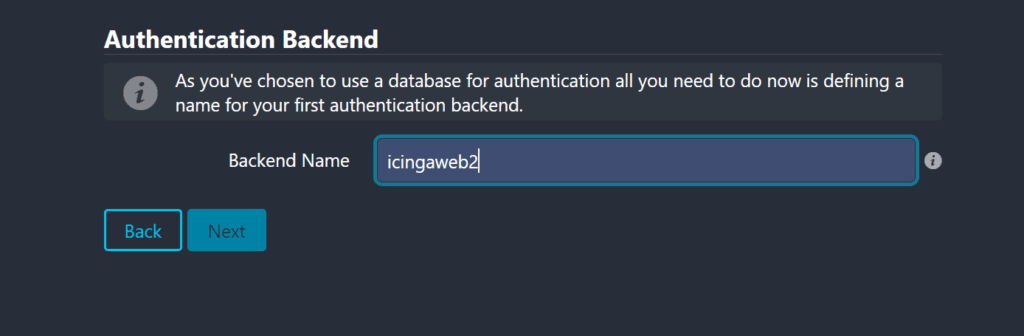
Provide a name
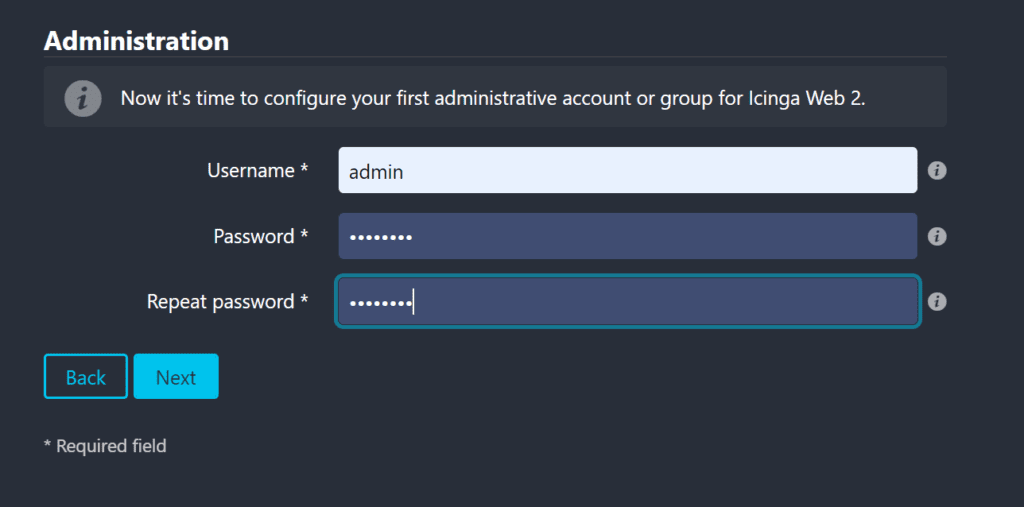
Create your super admin user
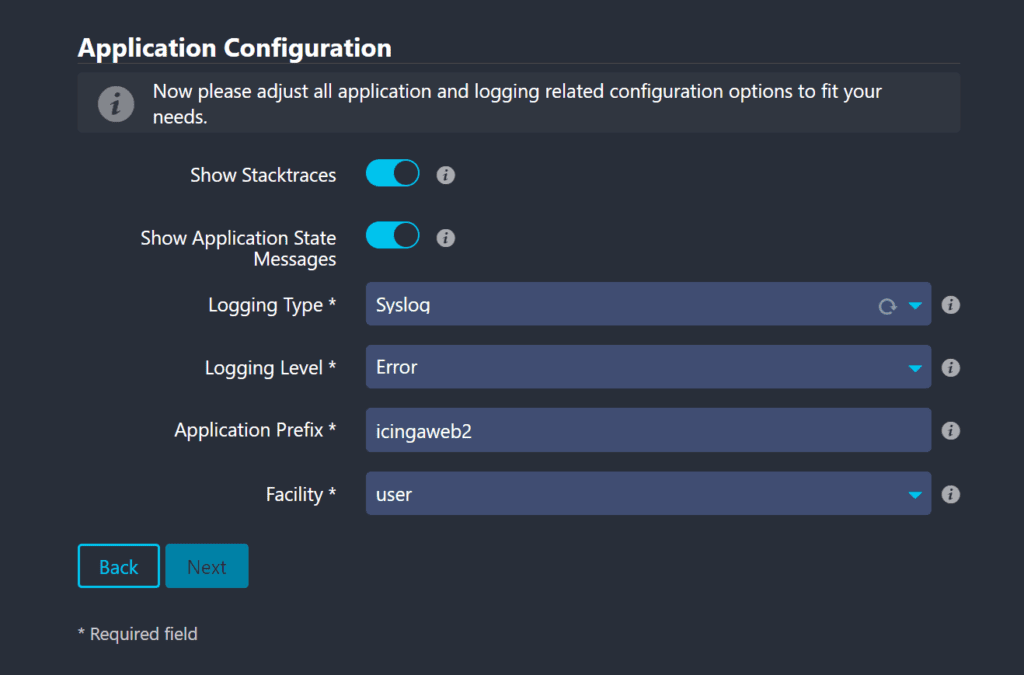
Leave defaults

Next
Next
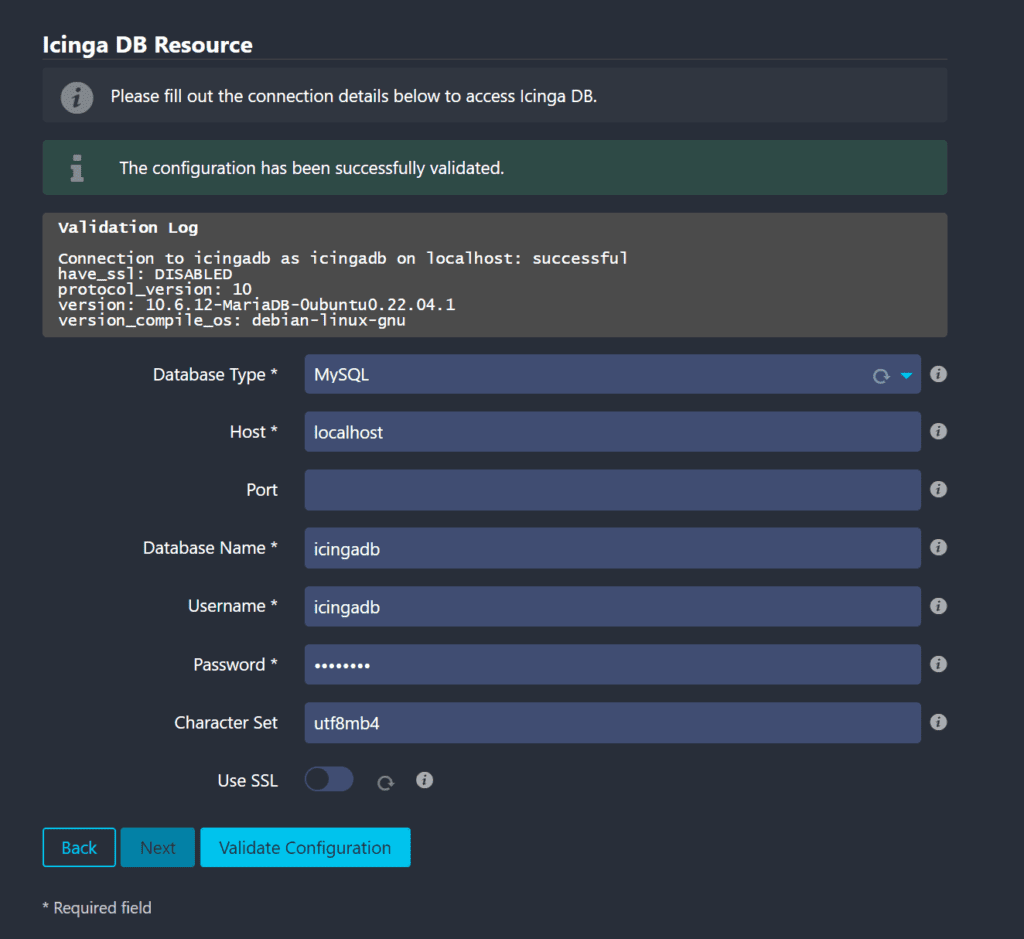
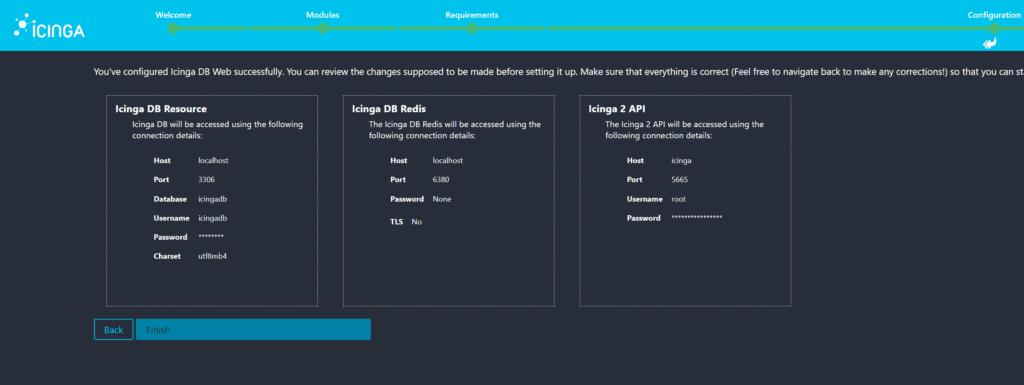
Provide details and press Next
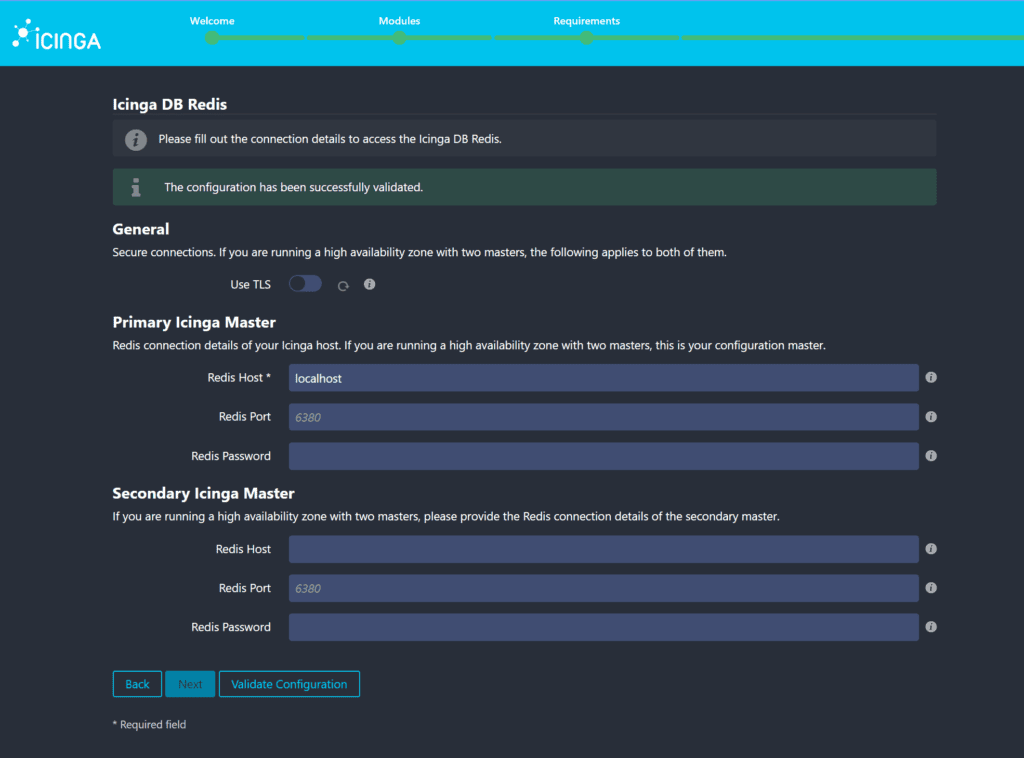
Provide the Redis host details and press next.
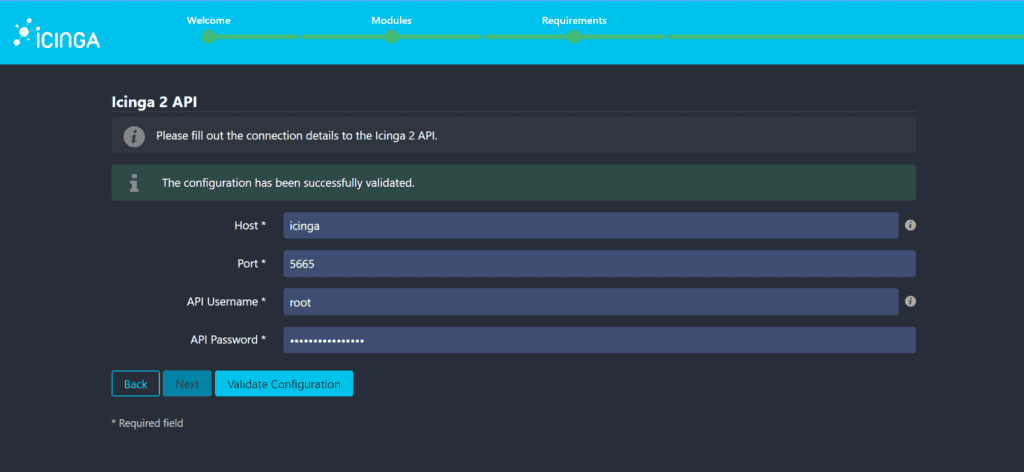
Input API credentials which can be found by executing the previous command:
cat /etc/icinga2/conf.d/api-users.confIf you have any issues, check the service statuses for the Icinga components and restart. Common issues are related to redis, icinga2 and icinga2db can be intercepted by checking the system log messages also.
Next
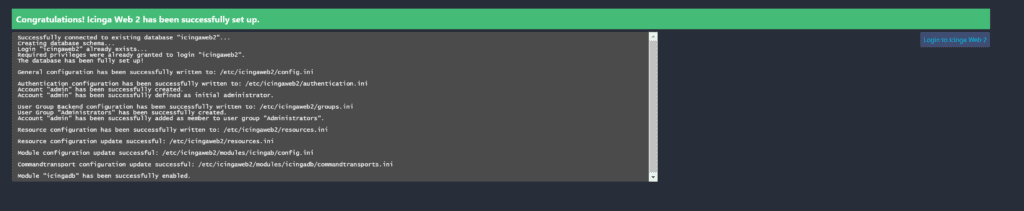
Click on the button to the right to access the login page.

Configure Director
Before doing anything lets configure Director, we will need to add the director database as a new resource and run it wizard.
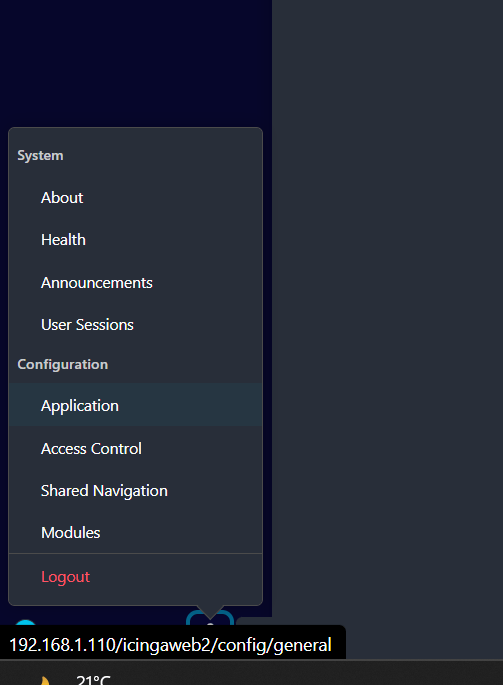
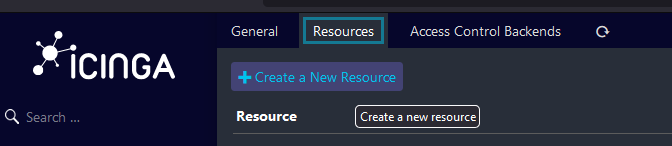
- Create a new resource for the Icinga Director database via the
Configuration → Application → Resourcesmenu. Please make sure that you configureutf8as encoding. - Select
Icinga Directordirectly from the main menu and you will be taken to the kickstart wizard. Follow the instructions and you are done!

Now you can enable the Director by choosing this new resource as a target. You will then be asked to create the schema.
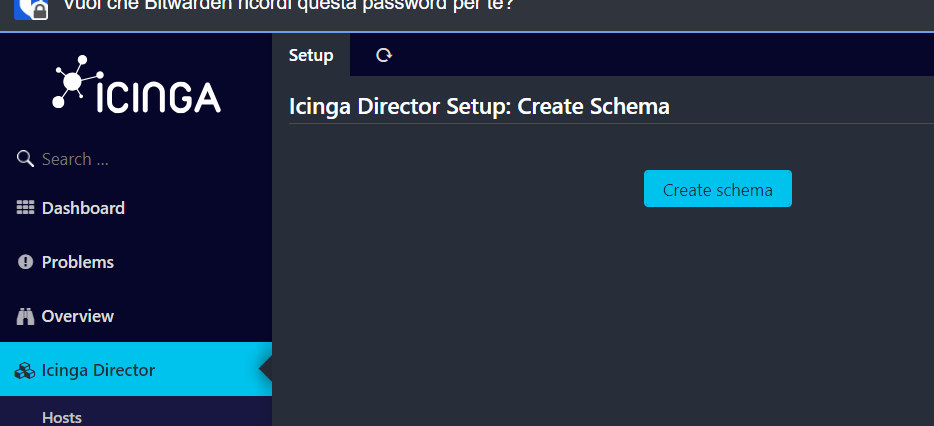
After schema has been created you will find multiple deployments pending that need to be pushed to the database.

Click on Deploy and that’s it! The system is installed and ready for action.